
This post is part of a series of posts on setting up your Sitecore application to run with Solr Cloud. We’ll be covering the procedure for setting up a Sitecore environment using the Solr search provider, and the creation of a 3-node Solr cloud cluster. This series is broken into four parts.
- Part 1 – Architecture
- Part 2 – Setting Up Zookeeper and Solr
- Part 3 – Creating Your Sitecore Collection
- Part 4 – Tuning Solr for Production
For the third part of this series, we will create our Sitecore collection, add replicas, and connect Sitecore to the collection. We’ll also go over load balancing the requests to distribute them among the Solr cloud nodes.
If you’ve never set up Sitecore with the Solr search provider before, you’ll need to know how to do that. Dan Solovay’s post on the topic is an excellent walk-through. We will go through the steps here of connecting Sitecore to a Solr Cloud, which will include many of the steps from Dan’s post. You’ll need to download the Solr support package from SDN. This series used Sitecore 7.2 update 3.
Creating the Sitecore Collection
Before we do anything with Sitecore, we need to create the the Solr collection that will hold our Sitecore indexes. Solr’s Collections API allows you to create collections, add replicas, split shards, delete collections, and so on. Most operations can be run on Solr via REST API calls from a browser.
Log into one of your Solr servers and open a browser. After verifying that Solr is up and running, run this command in the browser:
http://localhost:8983/solr/admin/collections?action=CREATE&name=itembuckets&numShards=1&replicationFactor=3&createNodeSet=node1.hostname:8983_solr,node2.hostname:8983_solr,node3.hostname:8983_solr&collection.configName=sitecoreconf
Here’s an explanation of the parameters.
name: The name of the collection, in this case “itembuckets” which is the name of the default collection Sitecore uses in the Solr package.
numShards: The number of shards this collection should have. We aren’t sharding, so we’ll use the default of 1. This is a required parameter.
replicationFactor: How many replicas to create. We want 1 replica on each of our 3 nodes, so 3.
createNodeSet: A list of nodes where the collection’s replicas should be created.
collection.configName: The name of the configuration to pull from Zookeeper. Recall that we created this configuration in Part 2.
If all went well you’ll see some confirmation XML,
<?xml version="1.0" encoding="UTF-8"?>
<response>
 <lst name="responseHeader">
 <int name="status">0</int>
 <int name="QTime">4212</int>
 </lst>
 <lst name="success">
 <lst>
 <lst name="responseHeader">
 <int name="status">0</int>
 <int name="QTime">2402</int>
 </lst>
 <str name="core">itembuckets_shard1_replica2</str>
 </lst>
 <lst>
 <lst name="responseHeader">
 <int name="status">0</int>
 <int name="QTime">3104</int>
 </lst>
 <str name="core">itembuckets_shard1_replica1</str>
 </lst>
 <lst>
 <lst name="responseHeader">
 <int name="status">0</int>
 <int name="QTime">4283</int>
 </lst>
 <str name="core">itembuckets_shard1_replica3</str>
 </lst>
 </lst>
</response>
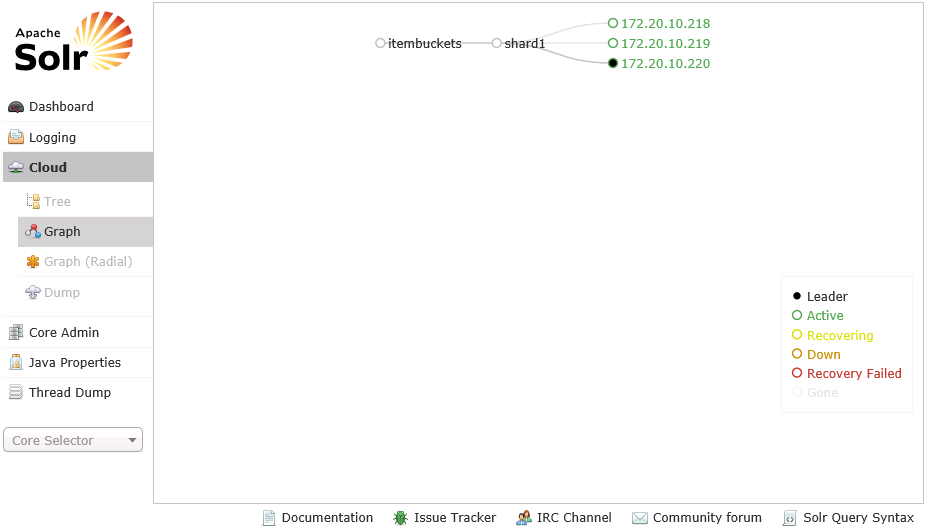
Check the Solr admin and click the Cloud tab. You should see a new collection, itembuckets, has been created and a replica on each of your 3 nodes.
Connecting Sitecore to Solr
Open the Sitecore Solr support package. This isn’t a standard Sitecore package that is installed through the package wizard, it’s just a regular zip file. Inside you’ll see a config file and a folder of DLLs.
To use Solr with Sitecore, you must add an IOC container to your project. For this series, I used Castle Windsor, but Sitecore provides support for many popular frameworks commonly used in .NET projects. The Solr support package references specific versions of these frameworks, so you’ll need to get the correct one.
You can get Castle Windsor from NuGet by running this command in Visual Studio:
Install-Package Castle.Windsor -version 3.1.0
You’ll need to set up the IOC container in your global.asax. Edit your application’s global.asax as follows,
<%@Application Language='C#' Inherits="Sitecore.ContentSearch.SolrProvider.CastleWindsorIntegration.WindsorApplication" %>
Copy the DLLs from the support package to your /bin folder, and the config file to your /App_Config/Include folder. Delete the Lucene configuration files. Edit Sitecore.ContentSearch.Solr.Indexes.config file, and change this setting,
<!-- SERVICE BASE ADDRESS
Base url of the Solr server. (minus any cores and minus a trailing slash)
-->
<setting name="ContentSearch.Solr.ServiceBaseAddress" value="http://node1.hostname:8983/solr" />
At this point everything should be set up. Recycle your Sitecore application pool, and log into the Sitecore admin. If everything is configured correctly, you should be able to rebuild the indexes from the indexing control panel. Verify that you can execute searches from the content editor.
Distributing Your Requests
You may have noticed that we set up Sitecore to connect to a single node in our Solr cloud. This defeats the purpose of having a cloud configuration. We want to distribute the requests across the replicas of our collection, and we want to ensure that if one node becomes unavailable the other nodes will continue to handle the requests seamlessly.
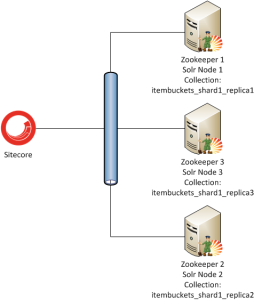 In Part 1 we went over the architecture of our Sitecore and Solr environment. The diagram included a load balancer between Sitecore and the Solr Cloud nodes. The load balancer in this setup distributes the requests between the constituent nodes in our Solr Cloud, and handles health checks on the nodes to take them out of rotation if they become unavailable.
Normally we’d use Zookeeper for this. Solr supports a querying syntax that handles querying a Solr cloud. Sitecore’s Solr search provider layer does not support this, so a load balancer is necessary. We still want to test our Sitecore application with distributed requests.
Fortunately, there are some IIS extensions we can use to simulate a load balancer in our test environment. The Application Request Routing module will allow us to create a server farm to distribute requests to, and the URL Rewrite module will let us create a rule to route requests to that server farm. Install URL Rewrite first.
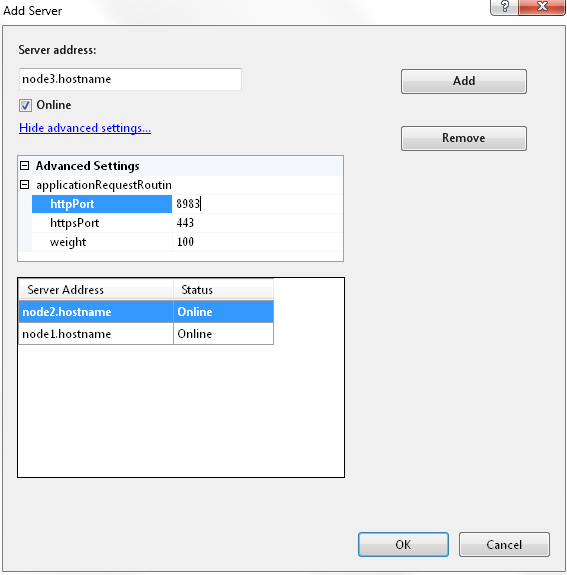
Once these extensions are installed, open IIS. You’ll notice a new item under Sites on the left-side pane called Server Farms. Click into that, and add a new server farm. Name it “Solr Cloud”.
Click Add Server on this server farm. In the dialogue, enter the address of the 3 Solr Cloud nodes set up. On each node, in the Advanced Settings section, change the port from 80 to 8983.
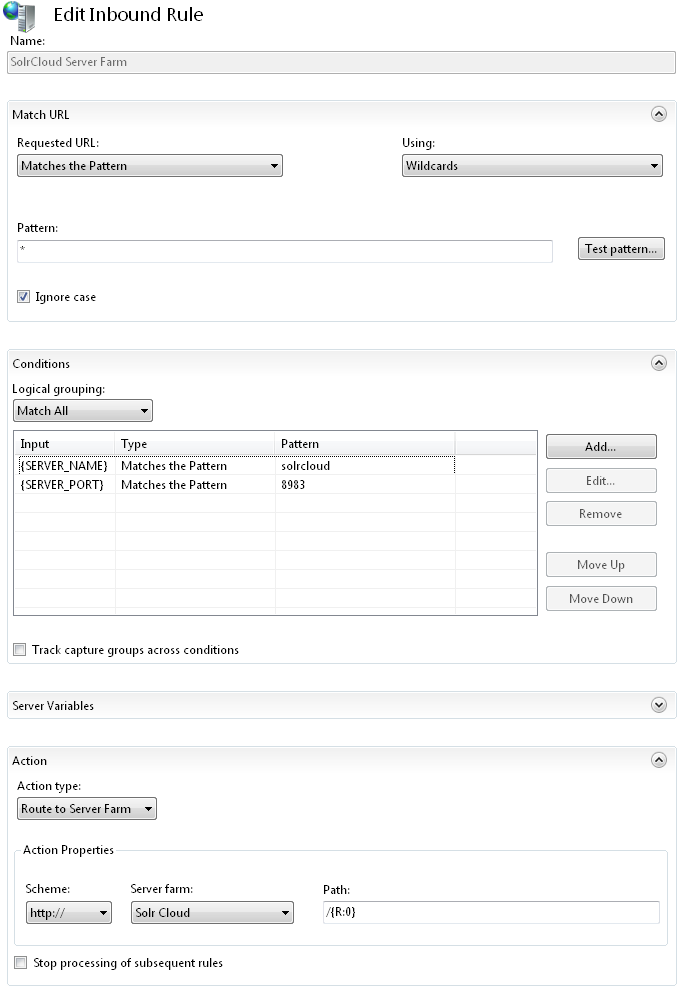
Next we’ll set up a request routing to this server farm. Add a hostfile entry for the address you want to use, like “solrcloud”. In IIS, click the Server node on the left. We’ll need to create a server level rewrite rule, as they are the only ones that allow us to route requests to a server farm. Click URL Rewrite and Add New Rule. Configure the rule like this,
IIS has to be configured to accept requests on port 8983. The easiest way to so this is to add a binding to the Default Website for all requests on port 8983.
We can set up a health check on these servers if we want to. Click the server farm we just created, and on the right click Health Test. Configure the test to your liking, and run it to see if the servers are responding.
At this point, hitting http://solrcloud:8983/solr in a browser should route the request to one of the nodes in our Solr Cloud. The next step is to change our Sitecore configuration to use this new hostname.
Edit Sitecore.ContentSearch.Solr.Indexes.config file, and change this setting again,
<!-- SERVICE BASE ADDRESS
Base url of the Solr server. (minus any cores and minus a trailing slash)
-->
<setting name="ContentSearch.Solr.ServiceBaseAddress" value="http://solrcloud:8983/solr" />
Recycle your application pool and log into Sitecore. Open the indexing control panel and rebuild your indexes. Try some searches in the content editor. If everything is setup correctly, you won’t notice any difference in functionality.
In IIS, check the Server Farm we just set up. Click the Monitoring and Management tool. You should see requests being distributed among the nodes in our Solr cloud. From the Load Balancing tool, you can configure the load balancing algorithm and distribution of your requests.