SitecoreAI, formerly XM Cloud, has released a new suite of AI-powered tools for marketers that open up new capabilities that go beyond the traditional CMS. In this post, we’ll explore how to setup SitecoreAI’s Signals to perform automated market research for you. Then, we’ll use the built-in agents to act upon those signals to quickly draft content.
In this scenario we’re going to imagine we’re a collectibles dealer. It’s the 30th Anniversary of Pokémon, and we want to have regular new content available to promote our Pokémon Card business during this promotional period.
Setting up Signals
Signals in SitecoreAI are market research agents that analyze trends and data in real time and provide you updates each day. You can configure these signals with a general topic, relevant industries, and a custom prompt to direct the agent when performing research on your behalf.
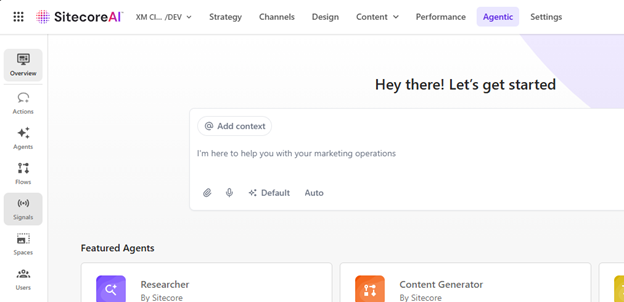
In the SitecoreAI dashboard, click Agentic on the top ribbon and then Signals on the left:
Next, let’s create a Signal. Our hypothetical business has a large inventory of trading cards we’re trying to sell. When I log into Sitecore each day, I want to see what’s happening in the collecting space and with this particular brand. I can set up a Signal to perform this research for me by defining a Topic, and Industry, and giving the agent a Prompt to guide its research.
To create the Signal, click the Edit icon on the Signals page or scroll to the bottom of the Agentic Studio landing page to find the Latest Signals section.
Once I’ve filled out my prompts, I can click Save & start tracking.
SitecoreAI will generate new Signals for me every day when I log in. If you want Signals immediately, click the Refresh icon and wait while the agent does its thing.
Here are the Signals SitecoreAI created for me from this prompt:
Analyzing Signals
Let’s open the 3rd Signal here, “Nostalgia-Driven Market Boosts in 30th Anniversary”.
Immediately I’m seeing some actionable information for our hypothetical card dealer. This Signal is telling me to stock up on Anniversary themed products if I don’t already have them, and that vintage cards are seeing price hikes.
We can dig deeper into this Signal by clicking Action Signal. This will trigger the AI agent to dig deeper into the topics of this Signal and recommend actions within the SitecoreAI studio’s capabilities.
After some thinking, SitecoreAI will generate an in-depth analysis of this signal. Digging into this I pulled some interesting suggestions from the signal and how to act upon them with Sitecore’s tools, specifically tailored to my online card-dealer business. Here’s a truncated snippet of some of that output that highlights specific tools and actions to take with those tools:
How to activate with Sitecore
Audience strategy and personalization (Sitecore CDP + Personalize)
• Segments:
• 90s/early-2000s returners: High content engagement, low recent purchase history. Personalize with nostalgia guides and entry-price bundles.
• Investors/slabbers: High AOV, graded inventory interest, price-tracker behavior.Surface grading-ready singles, pop report insights, insurance/guarantees.
...
Content and merchandising (XM Cloud + Content Hub)
• Launch a “30 Years of [Franchise]” hub: Timeline, iconic checklists, side-by-sideoriginals vs anniversary stamps
...Lifecycle messaging (Sitecore Send)
• Pre-announcement (T-45 to T-15): Teasers, waitlist capture, “what to buy” guides per segment.
...
This is an impressive framework of ideas that gets my marketing brain engaged with specific actions I might take using the tools in SitecoreAI!
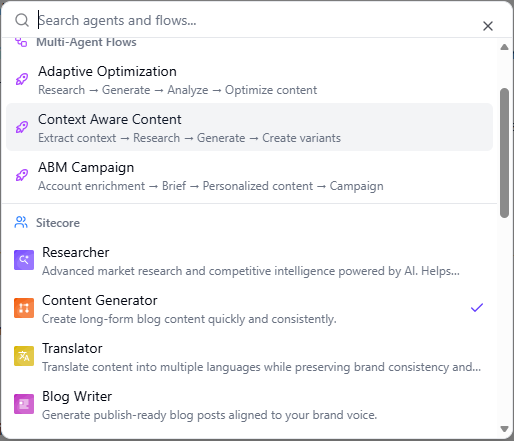
Let’s keep going. We can prompt SitecoreAI to take the output of this Signal’s analysis and act upon it with another agent. We can do this right from the chat window. In the chat box, click “Auto” and a selection of agents and flows appears:
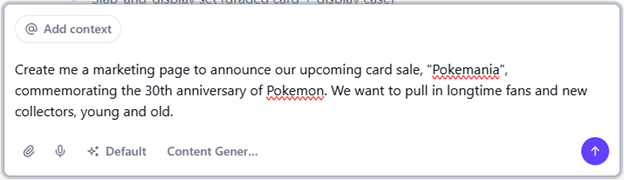
I’m going to ask SitecoreAI to create some content for my online card shop announcing our upcoming “Pokemania” card sale to our customers.
Send this to the agent and a sidebar pops up with your generated content:
From here I can edit this content, send it back to the agent with suggestions, or approve it and take it into Pages and spin up a new landing page announcing our sale.
Accelerated Marketing
In a matter of minutes, I was able to,
Set up a market research signal relevant to my business
Have an AI agent perform research on my behalf, with fresh insights available to me every morning when I log in
Action any of these signals to get concrete suggestions on how to act upon them using SitecoreAI’s toolset
Take the output of a signal and feed it to another agent in Agentic Studio to use as context for its work.
This is just scratching the surface of what we can do with the new Agentic Studio in SitecoreAI. My hypothetical online card dealer is off to a great start with this AI assistant.
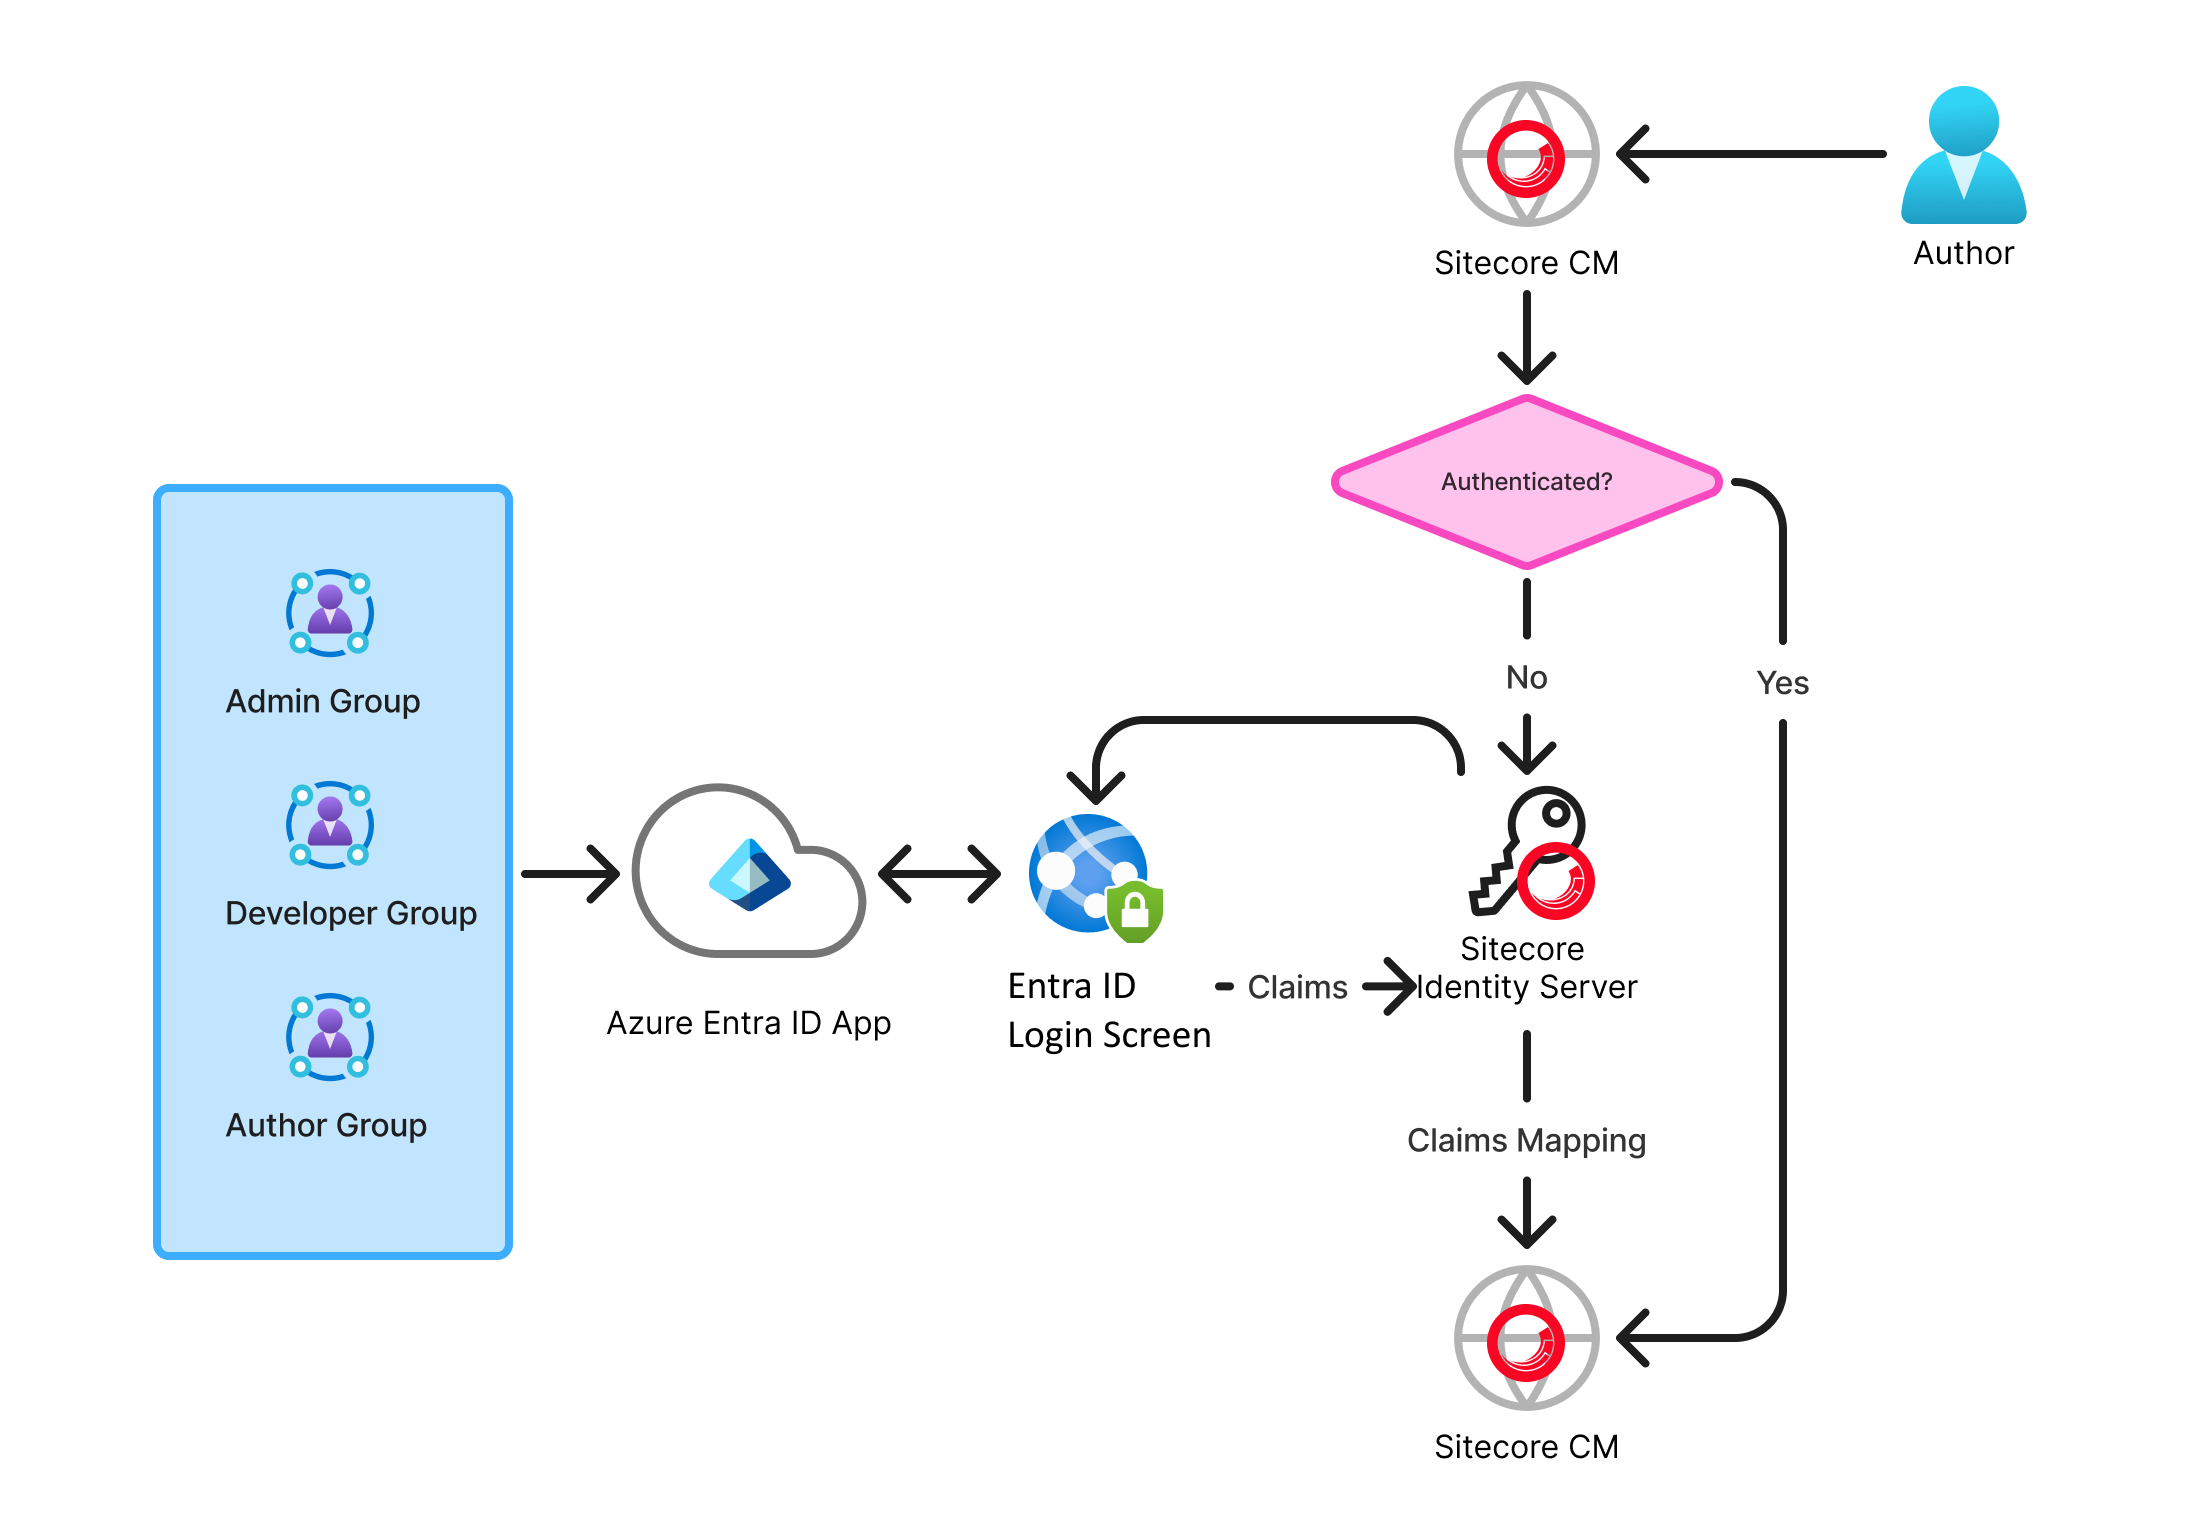
There are several posts out there about how to set up a Sitecore login process with Identity Server and Azure Entra ID (or, Azure AD). Recently I had to implement this for a customer and discovered that there was no one post that covered everything from end-to-end. So, we’ll do that here.
Here’s a quick diagram to demonstrate the login flow with Azure Entra ID and Sitecore:
There are a few pieces of this:
Azure Entra ID Application setup: Group definitions User group assignment Redirect URI
Sitecore Identity Server configuration: Entra ID app configuration Group claim to Sitecore Role mapping
Sitecore CM Configuration: Virtual user configuration Custom user builder User Claim to User Profile mapping
Entra ID App Setup
First, you need an Azure Entra ID app set up that will allow logins. That is outside of the scope of this post, we’re going to assume that the IT department of your org is handling that.
Ideally, each Sitecore environment requires a corresponding Entra ID App in Azure. This is primarily because of the Redirect URI parameter, which issues a redirect to Sitecore’s Identity Server after authentication, along with the claims in a JWT (JSON Web Token).
You’ll need the following information: Client ID and Tenant ID: These GUIDs map to the specific instance of Azure Entra ID your app will connect to. Redirect URI: Provide this to the Azure Entra ID app. This should be the URL of Identity Server, plus the sign-in endpoint. For example: https://identityserver.dev.local/signin-oidc
You’ll need to determine what groups in Azure will map to what roles in Sitecore, and note the GUIDs of these groups, as they’ll be sent over as claims for the user that you’ll need to map.
Identity Server Configuration
Next we’ll configure Sitecore Identity Server. The good news is that Sitecore 10.2 and later ships with an example configuration you can reference. But we’ll need to make some changes.
First, it’s very common for User Preferred Name to be sent across as a claim from Azure, as upn. Sitecore, be default, doesn’t accept this claim, so we need to configure it. To configure this. update the identityServer.xml file to add the upn claim as follows:
Next, you must enable the Azure AD (Azure Entra ID is a rebranding of Azure AD) configuration in Identity Server and add the app keys and group claim IDs. In this example, I’m mapping 3 groups to 3 different roles in Sitecore, Admin, Developer, and Author:
<?xml version="1.0" encoding="utf-8"?>
<Settings>
  <Sitecore>
    <ExternalIdentityProviders>
      <IdentityProviders>
        <AzureAd type="Sitecore.Plugin.IdentityProviders.IdentityProvider, Sitecore.Plugin.IdentityProviders">
          <AuthenticationScheme>IdS4-AzureAd</AuthenticationScheme>
          <DisplayName>Stewart SSO</DisplayName>
          <Enabled>true</Enabled>
          <ClientId>[Azure Entra ID App ClientId]</ClientId>
          <TenantId>[Azure Entra ID App TenantId]</TenantId>
          <MetadataAddress></MetadataAddress>
          <ClaimsTransformations>
            <!--Place transformation rules here. -->
            <ClaimsTransformation1 type="Sitecore.Plugin.IdentityProviders.DefaultClaimsTransformation, Sitecore.Plugin.IdentityProviders">
              <SourceClaims>
                <Claim1 type="http://schemas.xmlsoap.org/ws/2005/05/identity/claims/upn" />
              </SourceClaims>
              <NewClaims>
                <Claim1 type="upn" />
              </NewClaims>
            </ClaimsTransformation1>
            <ClaimsTransformation2 type="Sitecore.Plugin.IdentityProviders.DefaultClaimsTransformation, Sitecore.Plugin.IdentityProviders">
              <SourceClaims>
                <Claim1 type="http://schemas.xmlsoap.org/ws/2005/05/identity/claims/emailaddress" />
              </SourceClaims>
              <NewClaims>
                <Claim1 type="email" />
              </NewClaims>
            </ClaimsTransformation2>
            <!--Transformation samples-->
            <!--AzureAD user group to Sitecore role transformation.-->
            <AzureGroupTransformation1 type="Sitecore.Plugin.IdentityProviders.DefaultClaimsTransformation, Sitecore.Plugin.IdentityProviders">
              <SourceClaims>
                <Claim1 type="groups" value="[Author Group Claim ID]" />
              </SourceClaims>
              <NewClaims>
                <Claim1 type="role" value="sitecore\Author" />
              </NewClaims>
            </AzureGroupTransformation1>
			<AzureGroupTransformation2 type="Sitecore.Plugin.IdentityProviders.DefaultClaimsTransformation, Sitecore.Plugin.IdentityProviders">
              <SourceClaims>
                <Claim1 type="groups" value="[Developer Group Claim ID]" />
              </SourceClaims>
              <NewClaims>
                <Claim1 type="role" value="sitecore\Developer" />
              </NewClaims>
            </AzureGroupTransformation2>
            <!--AzureAD user in specific group to Sitecore admin user transformation-->
            <AzureADUserToAdminUser type="Sitecore.Plugin.IdentityProviders.DefaultClaimsTransformation, Sitecore.Plugin.IdentityProviders">
              <SourceClaims>
                <Claim1 type="groups" value="[Admin Group Claim ID]" />
              </SourceClaims>
              <NewClaims>
                <Claim1 type="http://www.sitecore.net/identity/claims/isAdmin" value="true"/>
              </NewClaims>
            </AzureADUserToAdminUser>
          </ClaimsTransformations>
        </AzureAd>
      </IdentityProviders>
    </ExternalIdentityProviders>
  </Sitecore>
</Settings>
Example path on local env: C:\inetpub\wwwroot\identityserver.dev.local\sitecore\Sitecore.Plugin.IdentityProvider.AzureAd\Config\Sitecore.Plugin.IdentityProvider.AzureAd.xml
Once these edits are complete, you must stop and start Identity Server for the changes to take effect.
Sitecore CM Configuration
Role mappings are sent over as claims from Identity Server. Virtual user creation and user profile claims mappings are handled by the Sitecore CMS app’s federated authentication pipelines. To accomplish this, a custom user builder was needed.
The custom user builder is necessary to map the upn claim to the virtual user’s username. Without this, Sitecore generates a random string of characters for the username, which is not useful for seeing what authors are doing in the CMS. Here is an example class, AzureEntraIdExternalUserBuilder.cs
namespace Thread.Foundation.Account.Services
{
	public class AzureEntraIdExternalUserBuilder : DefaultExternalUserBuilder
	{
		private readonly IHashEncryption _hashEncryption;
		public AzureEntraIdExternalUserBuilder(ApplicationUserFactory applicationUserFactory, IHashEncryption hashEncryption)
			: base(applicationUserFactory, hashEncryption)
		{
			_hashEncryption = hashEncryption;
		}

		protected override string CreateUniqueUserName(UserManager<ApplicationUser> userManager, ExternalLoginInfo externalLoginInfo)
		{
			Assert.ArgumentNotNull(userManager, "userManager");
			Assert.ArgumentNotNull(externalLoginInfo, "externalLoginInfo");
			ClaimsIdentity externalIdentity = externalLoginInfo.ExternalIdentity;
			IdentityProvider identityProvider = base.FederatedAuthenticationConfiguration.GetIdentityProvider(externalIdentity);
			if (identityProvider == null)
			{
				throw new InvalidOperationException("Unable to retrieve an identity provider for the given identity");
			}

			string domain = identityProvider.Domain;
			string upn = externalIdentity.Claims.FirstOrDefault((Claim c) => c.Type == "upn")?.Value;

			if (string.IsNullOrWhiteSpace(upn))
			{
				// No UPN claim found, fallback to default behavior
				return base.CreateUniqueUserName(userManager, externalLoginInfo);
			}

			return $"{domain}\\{upn}";
		}
	}
}
To enable this custom user builder, you must update the federated user mapping configuration:
Note we’re not mapping the upn claim to a profile property here. We’re only using that for the custom user builder to make the username in Sitecore match the username in Azure.
Also note the line IsPersistentUser. This setting determines if the user will be created as a virtual user or not. Toggling this to true will persist the user in the Core database, and is generally not considered best-practice.
Troubleshooting
When debugging this feature, you will likely need to inspect the claims sent to Sitecore. There are 2 steps here. The first set of claims is sent from Azure to Sitecore Identity Server. The second set of claims is sent from Sitecore Identity server to Sitecore CM.
Analyzing claims from Azure
To do this you need to capture the requests in your browser’s network tab. Look for a request to the Redirect URI defined in the Azure app. (E.g. On your local environment, this will be https://identityserver.dev.local/signin-oidc)
Look at the request’s Payload for the id_token. This is the JWT containing all the claims passed from Azure to Sitecore Identity Server. You can copy/paste this value into a tool that decodes JWT tokens, such as JWT.IO
If you’ve ever worked on a Sitecore XP project, especially using the Helix patterns, you’ve probably experienced assembly version conflicts with your nuget package dependencies. Essentially, a package referenced in nuget is pulls in a dependency that overwrites an assembly that ships with Sitecore with a newer version, leading to an error.
Sometimes you just need to reference an assembly in your code, but not actually deploy it. At first glance there seems to be no way to do this in the nuget package manager. You can, however, do this directly in the .csproj file.
In this example, I needed to reference Microsoft.AspNet.Owin to work on a feature using federated authentication. When I published my project, it pulled in a bunch of other DLLs, the package’s transitive dependencies, that overwrote the ones Sitecore shipped with. In this example, the easiest solution is to tell MSBuild to not publish this package, since it’s already in the /bin folder. But, we still need to include this package for compilation.
The solution is to add <IncludeAssets>compile</IncludeAssets> to the .csproj in the package declaration. For example, with my Microsoft.AspNet.Owin package, the package declaration would look like this:
In a recent Sitecore XP project, we built a controller route that generates PDFs of the pages on demand. While this worked well functionally, we realized that without any rate limiting, users (or bots) could easily overload the server by repeatedly hitting the endpoint. To prevent performance issues by overloading the server, we needed a simple way to throttle requests to this route.
The MvcThrottle Module
After exploring a few options, we landed on the MvcThrottle module that allows you to limit the number of HTTP requests a client can make to your Web API or MVC endpoints over a specified time window.
MvcThrottle tracks incoming requests based on client IP, endpoint, or custom keys, and enforces rate limits using in-memory or distributed stores. You can configure limits per second, minute, hour, or day, and when a limit is exceeded return a 429 Too Many Requests response.
Implementation in Sitecore XP
Here’s how we integrated MvcThrottle into my Sitecore XP solution:
Add the NuGet Package I added the MvcThrottle package to the Foundation layer of my solution, in this case the Foundation module handling Mvc customizations, using NuGet:
Install-Package MvcThrottle
Register the MvcThrottle Module MvcThrottle is typically registered in Global.asax, but since this is a Sitecore solution, I registered it via the Sitecore initialize pipeline for modularity and to avoid global configurations
using System.Web.Mvc;
using Sitecore.Pipelines;
using MvcThrottle;

namespace MyProject.Foundation.Mvc.Pipelines.Initialize
{
  public class RegisterMvcThrottle
  {
    public void Process(PipelineArgs args)
    {
      var throttleFilter = new ThrottlingFilter
      {
        Policy = new ThrottlePolicy(
          // Required parameter, set to null if not needed
          perSecond: null,
          perMinute: 5,
          perHour: 100)
        {
          IpThrottling = true
        },
        Repository = new CacheRepository()
      };

      GlobalFilters.Filters.Add(throttleFilter);
    }
  }
}
Apply the MvcThrottle Attribute Next, I decorated the PDF generation controller action with the [EnableThrottling] attribute to enforce rate limits:
[HttpGet]
[EnableThrottling]
public ActionResult Pdf(string id)
{
  // Pdf generation logic...
}
In this case we’re using the defaults configured in the module registration. If desired, you can set custom throttling parameters on each action by passing parameters with the EnableThrottling attribute.
Handle 429 Errors Finally, we need to handle the error thrown when a throttling limit is reached. This should map to a page in your site, like the 404 page, with a useful error. If you have a Foundation error handling module, you can handle it there. The simplest approach is to configure a custom error page for HTTP 429 responses in web.config:
MvcThrottle provided a quick and effective way to protect my PDF generation route from abuse. It’s easy to integrate, works well with Sitecore, and offers enough flexibility for most throttling scenarios. In this example we’re throttling by IP. It’s possible to configure this differently by changing the caching strategy. For example, if your site requires authentication, you could throttle by user id instead.
In the previous post I talked about how to wire up Sitecore Pages to use your local Content SDK editing host. This post will describe how to switch it in your deployed XM Cloud environment.
If you created your XM Cloud project using the auto-generated repository, you got a clone of the XM Cloud starter kit. That project, currently, includes 2 head apps: Next.js and Angular. By default, when you deploy your project, the Next.js app is set up as the editing host. You’ve now brought in a Content SDK app and want to switch the editing host to that one. So, how do you do it?
Turns out, it’s actually pretty simple. In your project root, look for xmcloud.build.json. Open that file, and add this to the renderingHosts section:
The path should be the path to the folder containing the Content SDK app. You’ll also want to set enabled to true, and set it to false for the other rendering hosts (or just remove those other hosts from this file altogether).
Shout out to Dan Solovay for the assist on this one!
The Sitecore XM Cloud Content SDK was recently released, and it offers a trimmed down, focused kit to build websites with XM Cloud. However, this new SDK hasn’t been put into the default starter kit codebase that gets created when you start a new project. This post will show you how to get your local development environment up and running with the Content SDK, and how to connect it to the Pages editor.
Create your project in XM Cloud Deploy
This step is straightforward. Use XM Cloud deploy to create your project, environment, and codebase. This will create you a repository from the xmcloud-foundation-head repository that Sitecore provides. You can also use the code-first approach if you so choose, but for the sake of simplicity this post assumes you let Sitecore create your project.
When the initial deployment is created, go ahead and create your site in the Sitecore Cloud portal. Choose the blank site starter template.
Once that process completes, go to the Desktop (you can find the Desktop from the Settings screen in the portal) and package up your site. You’ll want this to install to your local environments soon. You should also consider adding a Page Content component to the page to see something other than a blank screen when you load the site.
These are the paths you’ll need to package:
/sitecore/templates/Project/<Your Site Collection>
/sitecore/templates/Branches/Project/<Your Site Collection>
/sitecore/system/Settings/Project/<Your Site Collection>
/sitecore/media library/Project/<Your Site Collection>
/sitecore/layout/Placeholder Settings/Project/<Your Site Collection>
/sitecore/layout/Renderings/Project/<Your Site Collection>
/sitecore/layout/Placeholder Settings/Project/<Your Site Collection>
Once your environment is up and running, install the package you just created to your local CM, located at: https://xmcloudcm.localhost/sitecore/
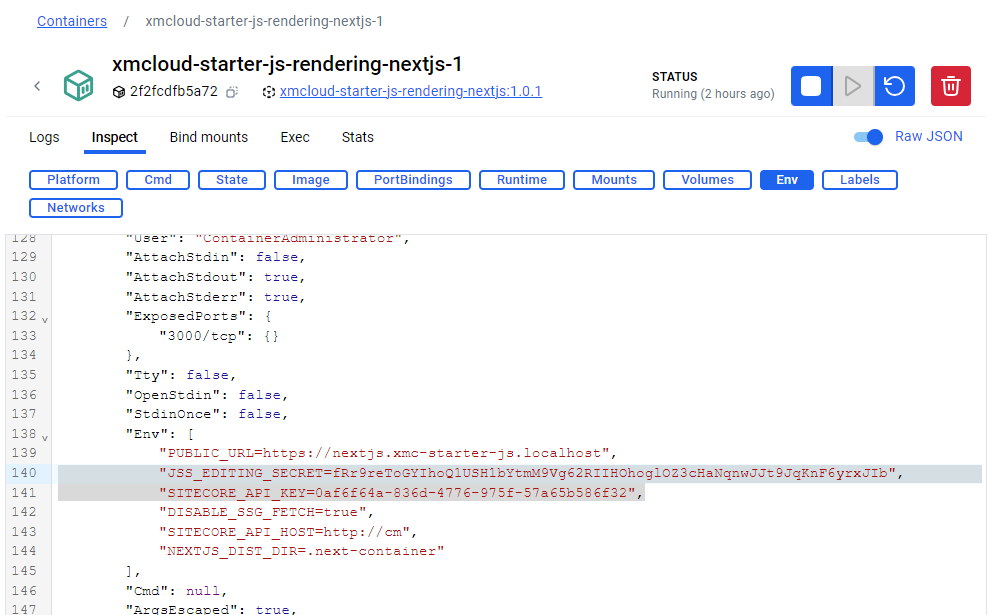
You’ll need to get some environment variables from your local rendering host. Some of these are created when you run init.ps1 to scaffold your containers environment. You can get these from the Docker container, or from the .env file in the /local-containers folder in your project root.
Copy the JSS_EDITING_SECRET and SITECORE_API_KEY values.
To connect to a local CM running in Docker, the steps are similar. Create a .env.local file in the root of your Content SDK project. Add the follwing environment variables:
NEXT_PUBLIC_SITECORE_SITE_NAME=<your Site name from the package>
NEXT_PUBLIC_SITECORE_API_HOST=https://xmcloudcm.localhost
NEXT_PUBLIC_SITECORE_API_KEY=<your API key copied from the Docker container>
JSS_EDITING_SECRET=<your JSS Editing Secret copied from the Docker container>
DISABLE_SSG_FETCH=true
Then, in the terminal, run: npm install npm run start:connected
Test your app in your browser at http://localhost:3000. If you did it correctly you should see a white page with the Page Content component you created and packaged previously.
Connect the Pages Editor to your local environment
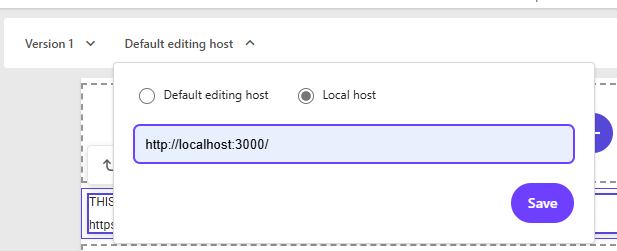
Finally, we want to be able to edit our content and test our components in our local environment before we push and deploy anything. To do that, we need to set up Pages to use our local editing host.
Go to https://pages.sitecorecloud.io/ and log in, then select your site. By default, you’re editing in your XM Cloud environment. Click the Default Editing Host dropdown and change it to localhost:
Afterward, you will see an error like this:
There’s one more step. We need to tell Pages to use our local CM as well. Open your browser tools (F12) and in the Application tab, add this key to local storage: Sitecore.Pages.LocalXmCloudUrl : https://xmcloudcm.localhost
After you do this, you should see your content rendering with the Content SDK and be able to edit the page.
Content SDK in Docker
This post does not cover is getting the Content SDK host running in a docker container. That isn’t strictly necessary to work locally with the Content SDK. However, if you’d prefer to replace the JSS rendering host with the Content SDK one, that will be covered in a later post.
TLDR: Delete any items without templates from your site’s content tree.
Recently when working with Sitecore Pages and my local docker-ized XM Cloud development environment, I ran into an error using the Pages editor. It had been working the previous week so I was stumped. My only clue was this error in the console: ApolloError: Object or reference not sent to instance of an object.
After scouring the documentation and re-doing my local setup, I was at a loss. Turns out, the solution was simple but (as of yet) undocumented, and probably the result of a recent update to Pages. Scouring the CM logs led me to the issue: items with no template.
Before signing off for the weekend, I had built a new component for this project. I pushed in all the code and serialization changes to my branch and opened a pull request for the team to review. When I came back to work on Monday, I swapped back to the development branch before spinning up my containers again.
Swapping branches and re-running serialization removed all the templates and renderings for my new component. However, it did not remove the test items I had created when developing the component, specifically the datasource items in the content tree. These items now had no template. Clicking them in content editor caused an error. And, it turns out, it was also causing the ApolloError in Pages.
To remove them, I had to use the Sitecore dbbrowser tool, at /sitecore/admin/dbbrowser.aspx. Once I did this, Pages was able to connect to my local environment again without issue.
Things move fast in the world of SaaS products like XM Cloud and Pages. This issue may be fixed next week, or it may hang around for a while. Regardless, it’s best to clean up any content items without a template in your local environments if you swap branches as you work on your project.
In the last post we went over setting up Experience Edge to set up a webhook whenever a publish is completed. In this post, we’ll handle receiving that webhook event to push published updates to our search index.
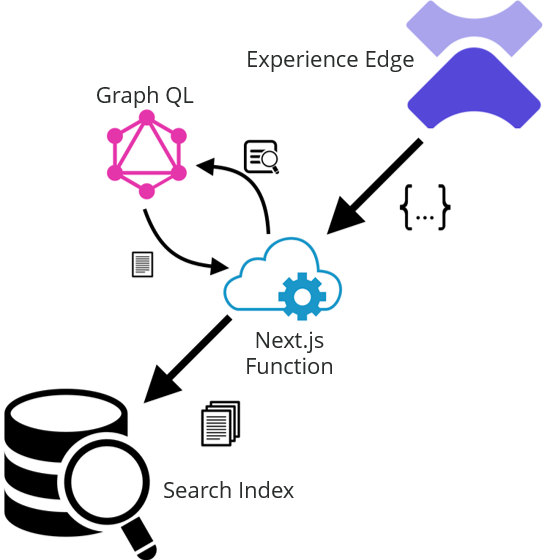
First let’s review the high-level architecture. Our webhook fires after a publish to Experience Edge completes. We need to send this to a serverless function in our Next.js app. That function will be responsible for parsing the json payload from the webhook and pushing any changes to our search index. This diagram illustrates the process:
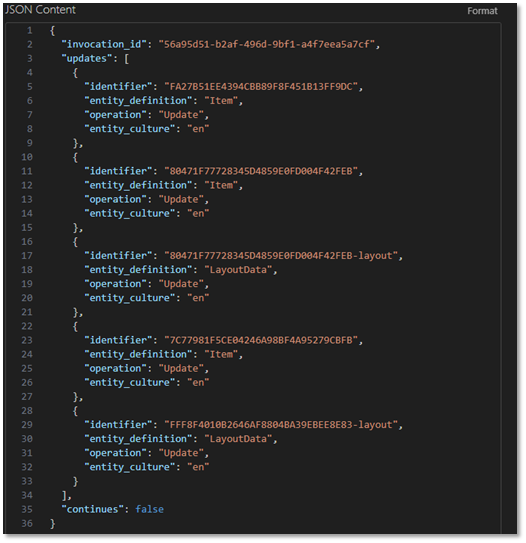
Before we build our serverless function, let’s take a look at the json that gets sent with the webhook :
Note that this webhook contains data about everything in the publish operation. For search index purposes, we’re interested in updates to pages on the website. This is represented by in the payload by "entity_definition": "LayoutData". Unfortunately, all we get is the ID of the item that was updated rather than the specific things that changed. That means we’ll need to query for the page data before pushing it to the search index.
Now that we understand the webhook data we’re dealing with, we need to make our function to handle it. If you’re using Vercel to host your web app, creating a serverless function is easy. Create a typescript file in the /pages/api folder in your app. We’ll call this handler “onPublishEnd.ts”. The function needs to do the following:
Loop over all “LayoutData” entries
Query GraphQL for that item’s field data
Validate the item is part of the site we’re indexing
Push the aggregate content data to the search provider
Let’s look at a sample implementation that will accomplish these tasks:
// Import the Next.js API route handler import { NextApiRequest, NextApiResponse } from 'next'; import { graphqlRequest, GraphQLRequest } from '@/util/GraphQLQuery'; import { GetDate } from '@/util/GetDate';
// Define the API route handler export default async function onPublishEnd(req: NextApiRequest, res: NextApiResponse) { // Check if the api_key query parameter matches the WEBHOOK_API_KEY environment variable if (req.query.api_key !== process.env.WEBHOOK_API_KEY) { return res.status(401).json({ message: 'Unauthorized' }); }
// If the request method is not POST, return an error if (req.method !== 'POST') { return res.status(405).json({ message: 'Method not allowed' }); }
let data; try { // Try to parse the JSON data from the request body //console.log('Req body:\n' + JSON.stringify(req.body)); data = req.body; } catch (error) { console.log('Bad Request: ', error); return res.status(400).json({ message: 'Bad Request. Check incoming data.' }); }
const items = [];
// Loop over all the entries in updates for (const update of data.updates) { // Check if the entity_definition is LayoutData if (update.entity_definition === 'LayoutData') { // Extract the GUID portion of the identifier const guid = update.identifier.split('-')[0]
// Invoke the GraphQL query with the request //console.log(`Getting GQL Data for item ${guid}`); const result = await graphqlRequest(request); //console.log('Item Data:\n' + JSON.stringify(result));
// Make sure we got some data from GQL in the result if (!result || !result.item) { console.log(`No data returned from GraphQL for item ${guid}`); continue; }
// Check if it's in the right site by comparing the item.path if (!result.item.path.startsWith('/sitecore/content/Search Demo/Search Demo/')) { console.log(`Item ${guid} is not in the right site`); continue; }
// Add the item to the items array items.push(result.item)
} catch (error) { // If an error occurs while invoking the GraphQL query, return a 500 error return res.status(500).json({ message: 'Internal Server Error: GraphQL query failed' }) } } } // Send the json data to the Yext Push API endpoint const pushApiEndpoint = `${process.env.YEXT_PUSH_API_ENDPOINT}?v=${GetDate()}&api_key=${process.env.YEXT_PUSH_API_KEY}`; console.log(`Pushing to ${pushApiEndpoint}\nData:\n${JSON.stringify(items)}`);
// Send all the items to the Yext Push API endpoint const yextResponse = await fetch(pushApiEndpoint, { method: 'POST', headers: { 'Content-Type': 'application/json', }, body: JSON.stringify(items), });
if (!yextResponse.ok) { console.log(`Failed to push data to Yext: ${yextResponse.status} ${yextResponse.statusText}`); }
This function uses the Next.js API helpers to create a quick and easy API endpoint. After some validation (including an API key we define to ensure this endpoint isn’t used in unintended manners), the code goes through the json payload from the webhook and an executes the tasks described above. In this case, we’re pushing to Yext as our search provider, and we’re sending all the item’s field data. Sending everything is preferable here because it simplifies the query on the app side and allows us to handle mappings and transformations in our search provider, making future changes easier to manage without deploying new code.
As the previous post stated, CREATE and DELETE are separate operations that will need to be handled with separate webhooks. There may still be other considerations you’ll need to handle as well, such as a very large publish and the need to batch the querying of item data and the pushes to the search provider. Still, this example is a useful POC that you can adapt to your project’s search provider and specific requirements.
In a previous post, we went over how to use GraphQL and a custom Next.js web service to crawl and index our Sitecore XM Cloud content into a search provider. That crawler runs on a schedule, so what happens when your authors update their content? They’ll need to wait for the next run of the crawler to see their content in the search index. This is a step back in capabilities from legacy Sitecore XP, which updated indexes at the end of every publish.
It’s possible to recreate this functionality using Experience Edge webhooks. Experience Edge offers quite a few webhook options (see the list here). To enable near real-time updates of our search index, we’ll use the ContentUpdated webhook, which fires after a publish to Edge from XM Cloud finishes. Let’s take a look at an example payload from that webhook:
As you can see, we have item data here and layout data. The layout data is what we’re interested in, as this represents our actual web pages, and that is what we want to index.
The general process is as follows:
Set up a receiver for this webhook. We’ll do this with a Next.js function.
Loop over the webhook payload and for each piece of LayoutData, then make a GraphQL query to get the field data from Experience Edge.
Finally, roll up the field data into a JSON object and push it to our search index.
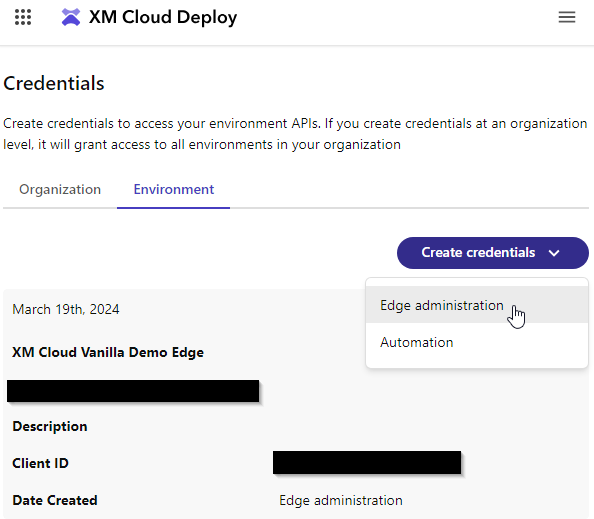
Let’s start by setting up our webhook. You’ll need to create an Edge administration credential in the XM Cloud Deploy app. Make note of the Client ID and Client Secret. The secret will only be displayed once, so if you lose it you will need to create new credentials.
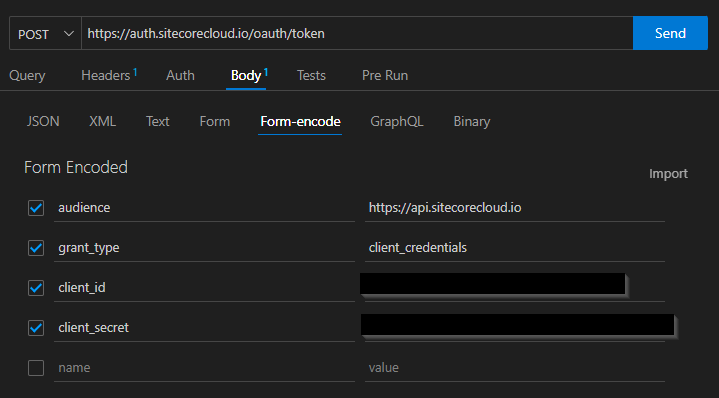
The next step is to create an auth token, you’ll need this to perform any Experience Edge administration actions. I used the ThunderClient plugin for Visual Studio Code to interact with the Sitecore APIs. To create an auth token, make a post request to https://auth.sitecorecloud.io/oauth/token with the following form data, using the client id and secret you just created in XM Cloud:
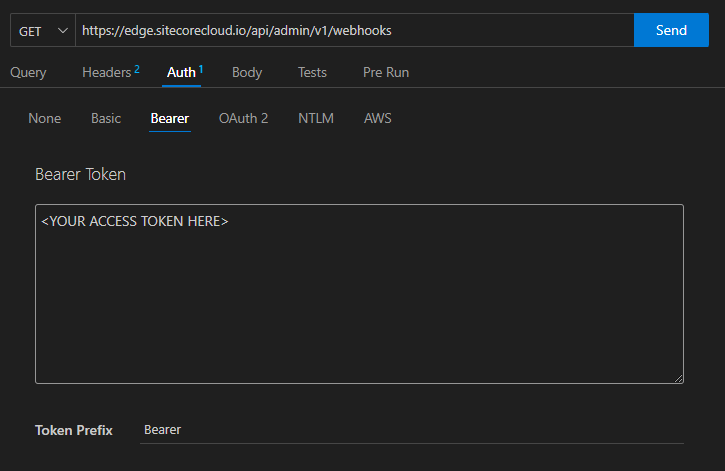
You’ll get back a json object containing an access token. This token is needed to be sent along with any API requests to Experience Edge. This token is passed as a Bearer Token in the Auth header. We can test it with a simple GET request that will list all the webhooks in this Edge tenant.
You should get back a json object containing a list of all the webhooks currently set up in your tenant (which is likely none to begin). The auth tokens expire after a day or so. If you get a message like edge.cdn.4:JWT Verification failed in your response, you have a problem with your token and should generate a new one.
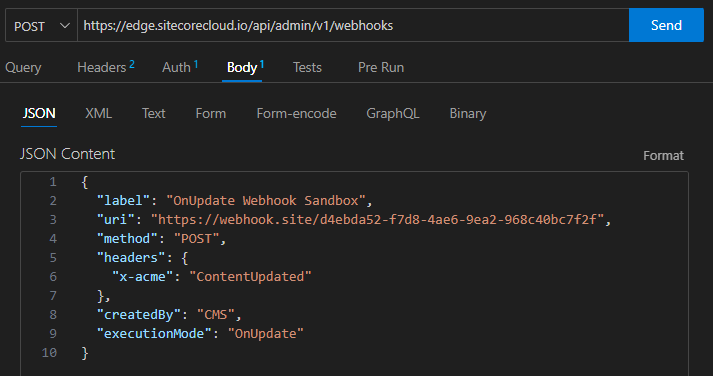
Next let’s create our ContentUpdated webhook. You’ll need something to receive the webhook. Since we haven’t created our function in Next.js yet, we can use a testing service like Webhook.site. Create a POST request to https://edge.sitecorecloud.io/api/admin/v1/webhooks with the following body:
The important parameters here are uri and executionMode. The uri is where the webhook will be sent, in this case our testing endpoint at webhook.site. The execution mode OnUpdate indicates this will fire when content is Updated. (Note: There are separate webhooks for create and delete, which you will probably need to set up later following this same pattern.)
Send this request and you’ll get a response that looks like this:
Try your GET request again on https://edge.sitecorecloud.io/api/admin/v1/webhooks, and you should see your webhook returned in the json response.
Try making some content updates and publishing from XM Cloud. Over at webhook.site, wait a few minutes and make sure you’re getting the json payload sent over. If so, you’ve set this up correctly.
To delete this webhook, you can send a DELETE request to https://edge.sitecorecloud.io/api/admin/v1/webhooks/<your-webhook-id>. Make sure you include your auth bearer token!
In the next post, we’ll go over handling this webhook to push content updates into our search index.
This is the first post in a series where I’ll go over a basic set up to configure Sitecore Search to crawl and query your XM Cloud content. This post will cover crawling and indexing your content using a Web Crawler and a Sitemap trigger.
To begin, it’s helpful to define some terms used in Sitecore Search. We’ll start with some structural terms.
Entity: This is a document in the search index. Sitecore Search ships with two types of entities, Product and Content. We will be using the Content entity.
Attribute: These are the fields on your entities. Attributes are defined on the entity and make up the schema of your content in the search index, much in the same way you’d use fields on a Sitecore template to define your content schema in the CMS.
Source: Sources are what you use to index content.
Connector: Sources have connectors, which control how the source receives data and how you read it to index content. A connector must be selected when creating a source. Each type of connector serves a different purpose and dictates what options are available to extract your content.
Trigger: Triggers are added to a source to control how the source data is fetched. Each type of trigger behaves differently.
Extractor: You use extractors to pull data from your source and write it to your entity’s attributes. The types of extractors available depend on the connector you’re using.
Before we begin, a few callouts. These apply to the state of the product as of the time of this blog post, so it’s possible future enhancements will mitigate these.
You must have the Tech Admin role in Sitecore search. This is a role above the Admin role, and you will probably need to have your organization’s primary contact request it for you from Support as it’s not available to be assigned to users via the UI.
When you make a change in Sitecore Search, you must Publish it for it to take effect. It is possible to revert a publish, but only to the previous version and no further. Your version history can be viewed via the UI, but it offers very little detail on what you changed.
Make only 1 change at a time, and publish between each change. If you change more than one thing, such as defining 2 or more attributes on an entity, then attempt to save and publish, the tool will error and lose your entity altogether, effectively disabling your instance. You can Revert your changes to the previously published state to resolve the error, but you will lose all your changes.
To start, select Administration from the left menu and then Domain Settings. If you don’t see this option, you need the Tech Admin role. Select Entities, and the popup will show your Content entity. Note the Attributes template. By default it is set to “Attributes Template for Content” and has several defined attributes already. You probably don’t need these, so change it to “Base Attributes Template”. Do this now before making any other changes, because once you start editing the entity you cannot change the template. Save and publish this.
Let’s define our attributes. With the base template, we get three to start: Id, Source, and Document Activeness. Of the three, Id is required. Let’s add some basic information like Title and Url.
Click Attributes in the subnav, then Add Attribute. You’ll be presented with a form. Let’s start by adding a Title field. Fill out the form as follows:
Entity: content
Display Name: Title
Attribute name: title (Note: use all lower case and no spaces for attribute names)
Placement: Standard
Data Type: String
Mark as: Check “Required” and “Return in api response”
Save and publish this. Repeat to create the Url attribute.
We’re making these fields required because we want all documents in the index to have a name and a url. These are the basic pieces of data we need for every document in our index. If a document is crawled and it is missing or otherwise cannot map required field data, the document is not indexed.
We also check “Return in api response” to make the contents of this field available in the search API. We will be checking this for any attribute we want included in the documents returned by the search API.
Next let’s add a taxonomy field called Topics. In Sitecore XMC, the Topic field is a multilist that allows authors to choose multiple Topic items to tag the content with. Add another attribute and define it like this:
Entity: content
Display Name: Topic
Attribute name: topic
Placement: Standard
Data Type: Array of Strings
Mark as: Check “Return in api response”
We’re not making Topic required because not all of our documents will have a topic. We’re choosing Array of Strings as the data type because the Topic may have multiple values. Save and publish again.
In order to facet on Topic, we need to perform another step. Select Feature Configuration from the subnav. You’ll see a lot of options here. If you select API Response, you’ll see all the attributes you added so far (assuming you checked “Return in api response”). Select Facets, then click Add Attribute. Add the Topic attribute here, save, and publish.
Now we have defined a barebones entity with fields for Id, Title, and Url, and included a single facet field on it called Topic. The next step is to set up our Source to crawl our Sitecore XM Cloud content. We’ll be using a Web Crawler connector with a Sitemap trigger to accomplish this.
Before your crawl, you need to make the data available to crawl. First, a sitemap. If you’re using SXA, you can configure a Sitemap to be generated automatically. On your pages, you’ll want to make the data available via meta tags. If you’ve set up open graph meta tags, you’ll have Title and Url covered. You’ll need to add another meta tag for Topics in your head web app like so, <meta name="topic" content="Topic A">
First we need to create the source. Select Sources from the left menu, then Add Source. In the dialog, name your source Sitemap Crawler and choose “Web Crawler” from the connector dropdown. (We’ll cover Advanced Web Crawler in another post). Save this and open the Source Settings screen.
Scroll down to Web Crawler Settings and click Edit. Set the Trigger Type to Sitemap. Set the URL to the url of your sitemap. You can use the Experience Edge media url to the SXA generated sitemap file if you haven’t configured middleware to handle /sitemap.xml in your head app (which you should!) Set Max Depth to 0, because we don’t want to drill into any links on the page; we’re relying on the Sitemap to surface all our content we need crawled. Save and publish.
Next we’re going to configure our Attribute extractors. On Attribute Extraction, click Edit. On the next screen, click Add Attribute. You can select the attributes to be mapped in the popup. Configure your attribute Extraction Types as Meta Tag. Set the Value to the name of the meta tag on your page, “og:title” for Title, “og:url” for Url, and “topic” for Topic. Again, I recommend doing one at a time and saving and publishing between mapping each extractor in order to avoid errors. If prompted to run the crawler while saving, do not do it yet.
In this Attribute Extractors screen you can click Validate in the top nav. That presents a dialogue that lets you put in a url and text the extractors, which is a great feature. Try pasting in some of your web pages and make sure you’re extracting all the data correctly.
Finally you can return to the Sources screen and click the Recrawl and Reindex button on the right hand side of the listed source you just created. This button looks like a refresh icon of 2 curved arrows in a circle.
It takes Sitecore Search a bit to fire up a crawl job, but you can monitor this from the Analytics screen under Sources. If all went well you should see all your documents from your sitemap in the content entity index. If not, you’ll see that an error occurred here and you can troubleshoot from there.
From here, feel free to add more attributes to fill out your content entity schema, and to put your crawler on a schedule from the Sources -> Crawler Schedule screen.
In the next post, we’ll cover using the API to query content from the index.