TLDR: Delete any items without templates from your site’s content tree.
Recently when working with Sitecore Pages and my local docker-ized XM Cloud development environment, I ran into an error using the Pages editor. It had been working the previous week so I was stumped. My only clue was this error in the console: ApolloError: Object or reference not sent to instance of an object.
After scouring the documentation and re-doing my local setup, I was at a loss. Turns out, the solution was simple but (as of yet) undocumented, and probably the result of a recent update to Pages. Scouring the CM logs led me to the issue: items with no template.
Before signing off for the weekend, I had built a new component for this project. I pushed in all the code and serialization changes to my branch and opened a pull request for the team to review. When I came back to work on Monday, I swapped back to the development branch before spinning up my containers again.
Swapping branches and re-running serialization removed all the templates and renderings for my new component. However, it did not remove the test items I had created when developing the component, specifically the datasource items in the content tree. These items now had no template. Clicking them in content editor caused an error. And, it turns out, it was also causing the ApolloError in Pages.
To remove them, I had to use the Sitecore dbbrowser tool, at /sitecore/admin/dbbrowser.aspx. Once I did this, Pages was able to connect to my local environment again without issue.
Things move fast in the world of SaaS products like XM Cloud and Pages. This issue may be fixed next week, or it may hang around for a while. Regardless, it’s best to clean up any content items without a template in your local environments if you swap branches as you work on your project.
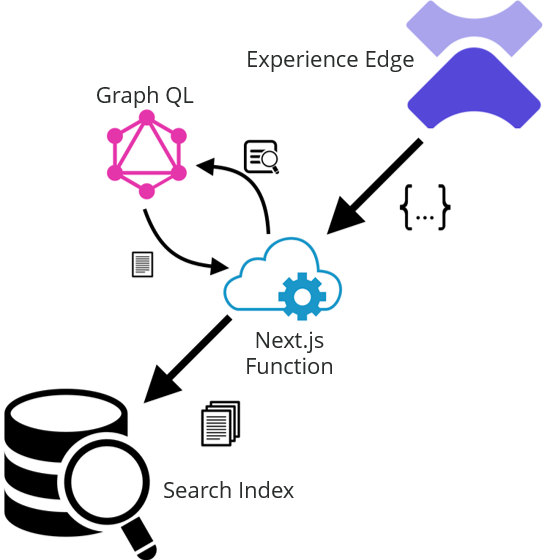
In the last post we went over setting up Experience Edge to set up a webhook whenever a publish is completed. In this post, we’ll handle receiving that webhook event to push published updates to our search index.
First let’s review the high-level architecture. Our webhook fires after a publish to Experience Edge completes. We need to send this to a serverless function in our Next.js app. That function will be responsible for parsing the json payload from the webhook and pushing any changes to our search index. This diagram illustrates the process:
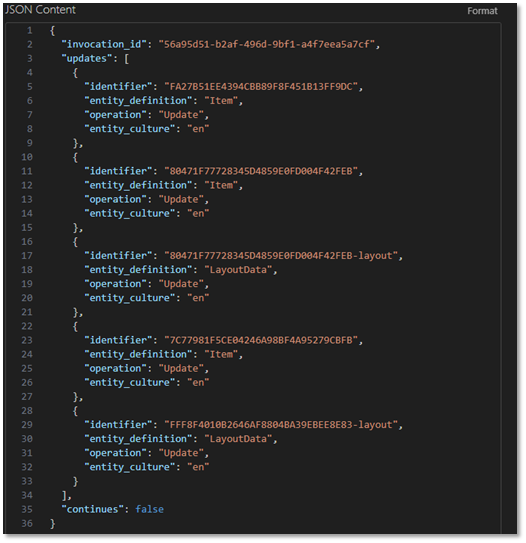
Before we build our serverless function, let’s take a look at the json that gets sent with the webhook :
Note that this webhook contains data about everything in the publish operation. For search index purposes, we’re interested in updates to pages on the website. This is represented by in the payload by "entity_definition": "LayoutData". Unfortunately, all we get is the ID of the item that was updated rather than the specific things that changed. That means we’ll need to query for the page data before pushing it to the search index.
Now that we understand the webhook data we’re dealing with, we need to make our function to handle it. If you’re using Vercel to host your web app, creating a serverless function is easy. Create a typescript file in the /pages/api folder in your app. We’ll call this handler “onPublishEnd.ts”. The function needs to do the following:
Loop over all “LayoutData” entries
Query GraphQL for that item’s field data
Validate the item is part of the site we’re indexing
Push the aggregate content data to the search provider
Let’s look at a sample implementation that will accomplish these tasks:
// Import the Next.js API route handler import { NextApiRequest, NextApiResponse } from 'next'; import { graphqlRequest, GraphQLRequest } from '@/util/GraphQLQuery'; import { GetDate } from '@/util/GetDate';
// Define the API route handler export default async function onPublishEnd(req: NextApiRequest, res: NextApiResponse) { // Check if the api_key query parameter matches the WEBHOOK_API_KEY environment variable if (req.query.api_key !== process.env.WEBHOOK_API_KEY) { return res.status(401).json({ message: 'Unauthorized' }); }
// If the request method is not POST, return an error if (req.method !== 'POST') { return res.status(405).json({ message: 'Method not allowed' }); }
let data; try { // Try to parse the JSON data from the request body //console.log('Req body:\n' + JSON.stringify(req.body)); data = req.body; } catch (error) { console.log('Bad Request: ', error); return res.status(400).json({ message: 'Bad Request. Check incoming data.' }); }
const items = [];
// Loop over all the entries in updates for (const update of data.updates) { // Check if the entity_definition is LayoutData if (update.entity_definition === 'LayoutData') { // Extract the GUID portion of the identifier const guid = update.identifier.split('-')[0]
// Invoke the GraphQL query with the request //console.log(`Getting GQL Data for item ${guid}`); const result = await graphqlRequest(request); //console.log('Item Data:\n' + JSON.stringify(result));
// Make sure we got some data from GQL in the result if (!result || !result.item) { console.log(`No data returned from GraphQL for item ${guid}`); continue; }
// Check if it's in the right site by comparing the item.path if (!result.item.path.startsWith('/sitecore/content/Search Demo/Search Demo/')) { console.log(`Item ${guid} is not in the right site`); continue; }
// Add the item to the items array items.push(result.item)
} catch (error) { // If an error occurs while invoking the GraphQL query, return a 500 error return res.status(500).json({ message: 'Internal Server Error: GraphQL query failed' }) } } } // Send the json data to the Yext Push API endpoint const pushApiEndpoint = `${process.env.YEXT_PUSH_API_ENDPOINT}?v=${GetDate()}&api_key=${process.env.YEXT_PUSH_API_KEY}`; console.log(`Pushing to ${pushApiEndpoint}\nData:\n${JSON.stringify(items)}`);
// Send all the items to the Yext Push API endpoint const yextResponse = await fetch(pushApiEndpoint, { method: 'POST', headers: { 'Content-Type': 'application/json', }, body: JSON.stringify(items), });
if (!yextResponse.ok) { console.log(`Failed to push data to Yext: ${yextResponse.status} ${yextResponse.statusText}`); }
This function uses the Next.js API helpers to create a quick and easy API endpoint. After some validation (including an API key we define to ensure this endpoint isn’t used in unintended manners), the code goes through the json payload from the webhook and an executes the tasks described above. In this case, we’re pushing to Yext as our search provider, and we’re sending all the item’s field data. Sending everything is preferable here because it simplifies the query on the app side and allows us to handle mappings and transformations in our search provider, making future changes easier to manage without deploying new code.
As the previous post stated, CREATE and DELETE are separate operations that will need to be handled with separate webhooks. There may still be other considerations you’ll need to handle as well, such as a very large publish and the need to batch the querying of item data and the pushes to the search provider. Still, this example is a useful POC that you can adapt to your project’s search provider and specific requirements.
Search is one of the biggest pieces of the puzzle when building a composable solution with Sitecore’s XM Cloud. Sitecore offers their own product, Sitecore Search, and there are a couple other search vendors that have native connectors. But what if you need to set up a search product that does not have a native connector to Sitecore, such as Yext? In this post, we’ll discuss how to use GraphQL + Experience Edge to crawl Sitecore via Yext’s API connector.
The first thing we want to do is figure out how we’ll get out content out of Sitecore. Ideally we want to be able to do this with a single query, rather than chaining queries together, in order to simplify the process of setting up the API crawler in Yext. For this, we’ll use a GraphQL search query. Let’s take a look at an example query:
Let’s take a look at this query, starting with the search filters.
_path allows us to query for every item that contains the rootPath in its path. For our site crawler, we’ll want to pass in the GUID of the site’s home page here.
_hasLayoutis a system field. This filter will exclude items that do not have a presenation assigned to them, such as folders and component datasources. We’ll want to pass in “true” here.
noIndex is a custom field we have defined on our page templates. If this box is checked, we want to exclude it from the crawl. We’ll pass in “1” here.
numResults controls how many results we’ll get back from the query. We’ll use 10 to start, but you can increase this if you want your crawl to go faster. (Be wary of the query response size limits!)
after is our page cursor. In our response, we’ll get back a string that points to the next page of results.
In the results area, we’re asking for some system fields like ID, name, path, and url. These are essential for identifying the content in Yext. After that, we’re asking for every field on the item. You may want to tune this to query just the fields you need to index, but for now we’ll grab everything for simplicity’s sake.
A question you may be asking is, “Why so many parameters?” The answer is to work around a limitation with GraphQL for Experience Edge:
Due to a known issue in the Experience Edge GraphQL schema, you must not mix literal and variable notation in your query input. If you use any variables in your GraphQL query, you must replace all literals with variables.
The only parameter we want to pass here is “after”, which is the page cursor. We’ll need our crawler to be able to page through the results. Unfortunately, that means we have to pass every literal value we need as a parameter.
In the results block we have our pages, along with all the fields we defined on the page template in the fields block. In the pageInfo block, we have endCursor, which is the string we’ll use to page the results in our crawler.
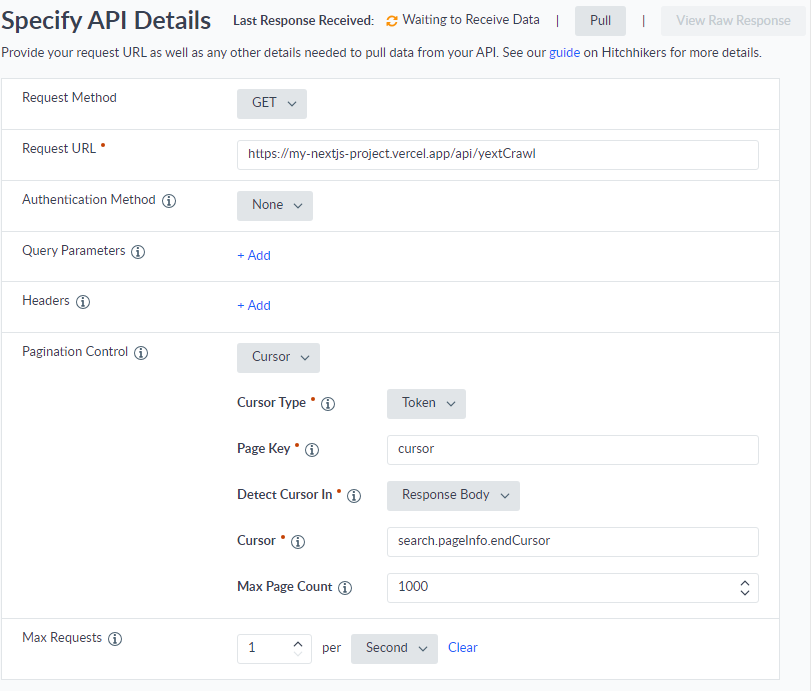
The next step is to set up the crawler in Yext. From Yext, you’ll want to add a “Pull from API” connector. On API Settings page, we can configure the crawler to hit Experience Edge in the Request URL field, pass our API key in the Authentication section, then put our GraphQL request in the Request Body section. Finally, we can set up the Pagination Control with our cursor. Easy, right?
Unfortunately, we’ll hit a problem here. Yext (as of this writing) only supports passing pagination parameters as query parameters. When we’re using GraphQL, we need to pass variables as part of the request body in the variables block. To work around this limitation, we’ll need to wrap our query in a simple API.
Next.js makes creating an API easy. You drop your api into the /pages/api folder and that’s it! Let’s make a simple API wrapper to take our page cursor as a query parameter and then invoke this query on Experience Edge. We’ll call our api file yextCrawl.ts.
We’re making a simple handler taking in a NextRequest and a NextResponse. We’ll check the request for our cursor parameter, if it exists. The GraphQL query we have as a literal string, cut and pasted from the XM Cloud playground where we tested it. The API key gets passed in the header, and we’ve configured this in our env.local and as an environment variable in Vercel.
Our request body will contain the query and the variables. This is where we’ll get around the limitation in the Yext Pull from API crawler. We’ll set up the cursor we pulled from the query parameters here. Our other variables we pass to the query are hard coded for the sake of this example.
Finally we use fetch to query Experience Edge and return the response. The result should be the same JSON we got from testing our query in the playground earlier. Once we deploy this api to Vercel, we can see it working at: https://my-nextjs-project.vercel.app/api/yextCrawl
Try hitting that url and see if you get back your Sitecore content. Then grab the endCursor value and hit it again, passing that value as the cursor parameter in the query string. You should see the next page of results.
Back in Yext, we’ll set up our Pull from API connector again, this time hitting our Vercel hosted API wrapper.
As you can see this is a lot easier to configure! Note the values of our cursor parameter under Pagination Control. These correspond to the cursor query parameter we defined in our wrapper API, and the endCursor data in the json response from our GraphQL query. It’s also important to configure the Max Requests setting. We’re limiting this crawler to 1 request per second so we don’t hit the request limit in Experience Edge.
You can test the connector with the Pull button on the top right. If you’ve set up everything correctly, you should see the View Raw Results button light up and be able to see your results in a modal window.
From here, you can configure the mappings of your Sitecore fields to your Yext entities. That is out of the scope of this post, but Yext’s documentation will help you there. One suggestion I will make is to map the Yext entity’s ID to the page’s Sitecore GUID, defined as id in our crawler query response.
Once it’s all set, save your connector, then you can run your crawler from the connector’s page by clicking “Run Connector”. If you’ve set everything up correctly, you should see your Sitecore content flowing into your Yext tenant.
Sitecore 9.1 has just hit, and with it comes a lot of exciting new features. You’ll probably be hearing and reading a lot about the Big Things they’re announcing with this release, such as the general availability of Sitecore Javascript Services (JSS), automated personalization with Cortex, Sitecore’s acquisition of digital asset manager StyleLabs, and their partnership with Salesforce.
However, there are some great quality of life enhancements coming with this release as well, which may be of particular interest to developers. Here’s a few that were highlighted.
Performance
Anyone who’s worked with Sitecore for a while, especially as a developer, has noticed how long it takes to start up the application. This can be a huge drag on productivity when you have to wait and wait for application pool recycles, especially if you’re in a rapid development cycle. You lose momentum, you lose focus, and it’s just annoying. The team at Sitecore has heard these complaints and made some serious strides on this in 9.1.
Sitecore showed some benchmarks and 9.1 is boasting a startup-time that’s cut in half. That’s time from a cold start of a CM instance to loading the Launchpad. Not bad! They’ve also cut the number of .dlls the /bin folder in half, increased the load time of the Content Editor by a factor of 6, and shaved some load time of the Experience Editor as well.
3rd Party Integrations
Sitecore has historically lagged behind in updating their integrations with supporting software. This was highlighted last year with the exposure of a security flaw in their Telerik version. In 9.1, we’ll see support for the latest versions of Sitecore’ supporting software, including Telerik, Newtonsoft Json.net, Solr, and of course .NET Core.
Horizon
The current Sitecore back-end has been essentially the same for many years, some CSS updates notwithstanding, and it’s lagging behind the competition. If you were at Symposium last year, it was mentioned during the closing keynote that Sitecore is working on an overhaul of their UI and authoring experience. This year they’ve announced the early-access availability of Horizon.
So, what is Horizon? Right now we’re not entirely sure. It’s meant to address the concerns of customers with the current Experience Editor. We know it’s an overhaul of the Experience Editor at least, but will it exist next to it, replace it outright, or complement it?
Sitecore is releasing an early access version of Horizon later this month and we’ll know a lot more. They want feedback, so as a developer you should download Horizon when it’s available, beat on it, and let them know what you think!
Native Indexing of Binary Content
Another small but welcome enhancement is the ability for the Content Search crawler to index PDF and MS Word files, out of the box. This was possible before with the installation of 3rd party tools, but Sitecore has heard their users and is wisely including this as a core feature.
That’s all for now. When Sitecore 9.1 hits, make sure to crack it open and put some of these changes through their paces. I certainly will be!
Check out Velir’s new video where we recap the 2017 Sitecore Symposium! I talk to our CTO Corey Caplette, Senior U/X Strategist Dan Murphy, and Development Manager Ed Schwehm and get their thoughts about the new features in Sitecore 9.
Velir’s Jabberwocky framework has been updated for Sitecore 9.0, initial release. This update doesn’t add any new features beyond support for Sitecore 9.
For now, the package is marked prerelease, due in-part to the dependency on Glass.Mapper, which is still in prerelease for Sitecore 9 support. We’ll be assessing the framework during our upcoming Sitecore 9 upgrades and projects, and we will correct any uncaught issues with the framework. A final release will be available in the coming months.
Publishing has been a sore spot lately for some of our clients due to the high amount of content they have in their Sitecore environment. When you start to get into hundreds of thousands of pieces of content, a full site publish is prohibitive. Any time a change is made that requires a large publish your deployment window goes from an hour to potentially an all-day affair. If a user accidentally starts a large publish, subsequent content publishes will get queued and backed up until that large publish completes, or until someone logs into the server and restarts the application.
There are options available to speed up the publishing process. Starting in Sitecore 7.2, parallel publishing was introduced, along with some experimental optimization settings. In Sitecore 8.2, we have a new option, the Sitecore Publishing Service.
What benefits can we see from these options? I decided to do some tests of large content publishes using these techniques. Each publishing option has its own caveats of course, but this post is concerning itself mainly with the publishing performance of each of the available options.
I wanted to run these tests in as pure an environment as possible. I set up 3 Sitecore 8.2 environments using Sitecore Instance Manager on my local machine. Using the FillDB tool, I generated 100,000 content items nested in a folder under the site root. Each of these items is of the Sample Item template that ships with a clean Sitecore installation. Full Publish on the entire site was used in each example. Each time the content was being published for the first time.
For benchmarking purposes, my local machine has the following specs,
Intel i7, 8 Core, 2.3 GHz CPU
16 GB RAM
Seagate SSHD (not an SSD, but it claims to perform like an SSD!)
Windows 7 x64, SP1
SQL Server Express 2015
.NET 4.6 and .NET Core installed
Default Publishing
The first test was doing a full site publish after generating 100,000 content items using the out-of-the-box publishing configuration. This is probably how most of Sitecore sites are configured unless you took steps to optimize the publishing processes. The results are, as expected, not great.
21620 12:19:30 INFO  Job started: Publish
21620 13:51:18 INFO  Job ended: Publish (units processed: 106669)
That’s over 90 minutes to publish these items, and the content items themselves only had 2 fields with any data.
Parallel Publishing
Next I tested parallel publishing, introduced in Sitecore 7.2. To use this, you need to enable Sitecore.Publishing.Parallel.config. Since I have an 8 core CPU, I set the Publishing.MaxDegreeOfParallelism setting to 8.
There is also Sitecore.Publishing.Optimizations.config, which contains, as the name implies, some optimization settings for publishing. The file comments state that the settings are experimental, and that you should evaluate them before using them in production. For purposes of this test, I ignored this file.
With parallel publishing enabled we see a much shorter publish time of around 25 minutes.
12164 14:27:10 INFO  Job started: Publish to 'web'
12164 14:52:58 INFO  Job ended: Publish to 'web' (units processed: 106669)
Publishing Optimizations
I reran the previous test with the Sitecore.Publishing.Optimizations.config enabled, along with the parallel publishing. This shortened the publish to around 15 minutes.
9836 15:52:34 INFO  Job started: Publish to 'web'
9836 16:07:20 INFO  Job ended: Publish to 'web' (units processed: 106669)
Sitecore Publishing Service
New in Sitecore 8.2 is the Publishing Service, which is a separate web application written in .NET Core that replaces the existing publishing mechanism in your Sitecore site. The documentation on setting up this service is thorough, so kudos to Sitecore for that, however it can be a bit dense. I found this blog post quite helpful in clearing up my confusion. Using it in conjunction with the official documentation, I was able to set up this service in less than an hour.
I ran into a problem using this method, however. The Publishing Service uses some new logic to gather the items it needs to publish, and one of the things it keys off of is the Revision field. Using the FillDb tool doesn’t explicitly write to the Revision field, therefore the service didn’t publish any of my generated items. I wound up running a script with Sitecore Powershell to make a simple edit to these items forcing the Revision field to be written. After that, my items published as expected.
The results were amazing. The new Publish Service was able to publish the entire site, over 100,000 items, in just over 4 minutes. That’s over 20x faster than the default publish settings.
Each of these optimizations come with caveats. Parallel Publishing can introduce concurrency issues if you’re firing events during publish. The optimization config settings need to be vetted before rolling out, as it disables or alters many features you may be using, even if you don’t realize you’re using them.
If you’re on Sitecore 8.2 I strongly recommend giving the Publishing Service a look. Like any change to your system, you’ll want to test the effects it has on your publishing events and other hooks before rolling it out.
This post is part of a series of posts on setting up your Sitecore application to run with Solr Cloud. We’ll be covering the procedure for setting up a Sitecore environment using the Solr search provider, and the creation of a 3-node Solr cloud cluster. This series is broken into four parts.
If you’re running Sitecore with Solr, you may have noticed crawling errors when you add versions in certain languages. A common requirement for multilingual sites is support for Chinese, which the generated Solr schema Sitecore provides does not support by default. Fortunately, it’s relatively simple to correct this and add support for Chinese, as well as other languages that aren’t available in the default schema. Continue reading Sitecore Solr Support for Chinese Language
This post is part of a series of posts on setting up your Sitecore application to run with Solr Cloud. We’ll be covering the procedure for setting up a Sitecore environment using the Solr search provider, and the creation of a 3-node Solr cloud cluster. This series is broken into four parts.
For the third part of this series, we will create our Sitecore collection, add replicas, and connect Sitecore to the collection. We’ll also go over load balancing the requests to distribute them among the Solr cloud nodes.

 Sitecore 9.1 has just hit, and with it comes a lot of exciting new features. You’ll probably be hearing and reading a lot about the Big Things they’re announcing with this release, such as the general availability of Sitecore Javascript Services (JSS), automated personalization with Cortex, Sitecore’s acquisition of digital asset manager StyleLabs, and their partnership with Salesforce.
 Velir’s Jabberwocky framework has been updated for Sitecore 9.0, initial release. This update doesn’t add any new features beyond support for Sitecore 9.