In the last post we went over setting up Experience Edge to set up a webhook whenever a publish is completed. In this post, we’ll handle receiving that webhook event to push published updates to our search index.
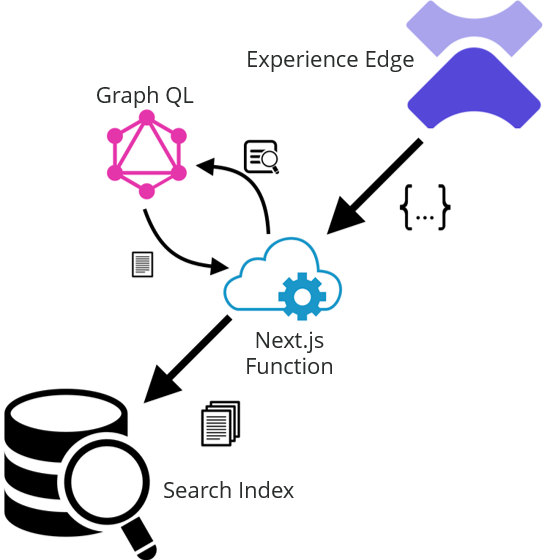
First let’s review the high-level architecture. Our webhook fires after a publish to Experience Edge completes. We need to send this to a serverless function in our Next.js app. That function will be responsible for parsing the json payload from the webhook and pushing any changes to our search index. This diagram illustrates the process:
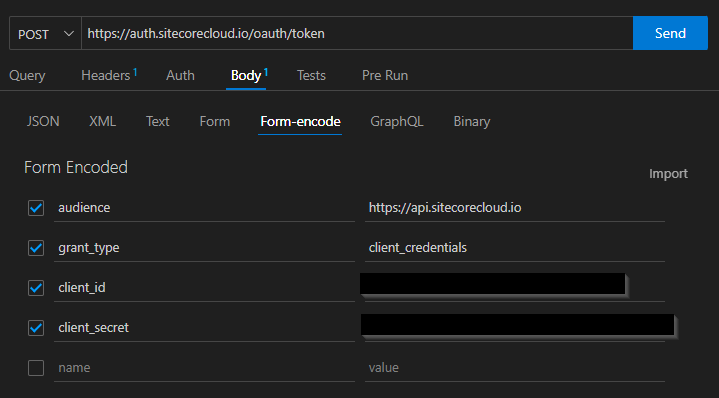
Before we build our serverless function, let’s take a look at the json that gets sent with the webhook :
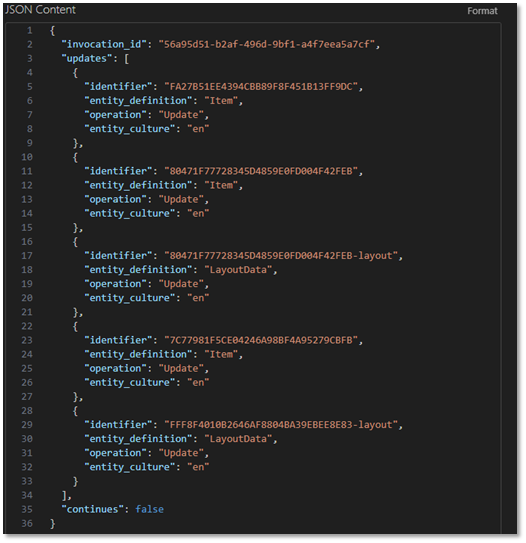
Note that this webhook contains data about everything in the publish operation. For search index purposes, we’re interested in updates to pages on the website. This is represented by in the payload by "entity_definition": "LayoutData". Unfortunately, all we get is the ID of the item that was updated rather than the specific things that changed. That means we’ll need to query for the page data before pushing it to the search index.
Now that we understand the webhook data we’re dealing with, we need to make our function to handle it. If you’re using Vercel to host your web app, creating a serverless function is easy. Create a typescript file in the /pages/api folder in your app. We’ll call this handler “onPublishEnd.ts”. The function needs to do the following:
- Loop over all “LayoutData” entries
- Query GraphQL for that item’s field data
- Validate the item is part of the site we’re indexing
- Push the aggregate content data to the search provider
Let’s look at a sample implementation that will accomplish these tasks:
// Import the Next.js API route handler
import { NextApiRequest, NextApiResponse } from 'next';
import { graphqlRequest, GraphQLRequest } from '@/util/GraphQLQuery';
import { GetDate } from '@/util/GetDate';

// Define the API route handler
export default async function onPublishEnd(req: NextApiRequest, res: NextApiResponse) {
  // Check if the api_key query parameter matches the WEBHOOK_API_KEY environment variable
  if (req.query.api_key !== process.env.WEBHOOK_API_KEY) {
    return res.status(401).json({ message: 'Unauthorized' });
  }

  // If the request method is not POST, return an error
  if (req.method !== 'POST') {
    return res.status(405).json({ message: 'Method not allowed' });
  }

  let data;
  try {
    // Try to parse the JSON data from the request body
    //console.log('Req body:\n' + JSON.stringify(req.body));
    data = req.body;
  } catch (error) {
    console.log('Bad Request: ', error);
    return res.status(400).json({ message: 'Bad Request. Check incoming data.' });
  }

  const items = [];

  // Loop over all the entries in updates
  for (const update of data.updates) {
    // Check if the entity_definition is LayoutData
    if (update.entity_definition === 'LayoutData') {
      // Extract the GUID portion of the identifier
      const guid = update.identifier.split('-')[0]

      try {
        // Create the GraphQL request
        const request: GraphQLRequest = {
          query: itemQuery,
          variables: { id: guid },
        };

        // Invoke the GraphQL query with the request
        //console.log(`Getting GQL Data for item ${guid}`);
        const result = await graphqlRequest(request);
        //console.log('Item Data:\n' + JSON.stringify(result));

        // Make sure we got some data from GQL in the result
        if (!result || !result.item) {
            console.log(`No data returned from GraphQL for item ${guid}`);
            continue;
          }

          // Check if it's in the right site by comparing the item.path
          if (!result.item.path.startsWith('/sitecore/content/Search Demo/Search Demo/')) {
            console.log(`Item ${guid} is not in the right site`);
            continue;
          }

          // Add the item to the items array
          items.push(result.item)

      } catch (error) {
        // If an error occurs while invoking the GraphQL query, return a 500 error
        return res.status(500).json({ message: 'Internal Server Error: GraphQL query failed' })
      }
    }
  }
 // Send the json data to the Yext Push API endpoint
 const pushApiEndpoint = `${process.env.YEXT_PUSH_API_ENDPOINT}?v=${GetDate()}&api_key=${process.env.YEXT_PUSH_API_KEY}`;
 console.log(`Pushing to ${pushApiEndpoint}\nData:\n${JSON.stringify(items)}`);

 // Send all the items to the Yext Push API endpoint
 const yextResponse = await fetch(pushApiEndpoint, {
    method: 'POST',
    headers: {
      'Content-Type': 'application/json',
    },
    body: JSON.stringify(items),
  });

  if (!yextResponse.ok) {
    console.log(`Failed to push data to Yext: ${yextResponse.status} ${yextResponse.statusText}`);
  }

  // Send a response
  return res.status(200).json({ message: 'Webhook event received' })
}

const itemQuery = `
query ($id: String!) {
    item(path: $id, language: "en") {
      id
      name
      path
      url {
        path
        url
      }
      fields {
        name
        jsonValue
      }
    }
  }

`;
https://github.com/csulham/nextjs-sandbox/blob/main/pages/api/onPublishEnd.ts
This function uses the Next.js API helpers to create a quick and easy API endpoint. After some validation (including an API key we define to ensure this endpoint isn’t used in unintended manners), the code goes through the json payload from the webhook and an executes the tasks described above. In this case, we’re pushing to Yext as our search provider, and we’re sending all the item’s field data. Sending everything is preferable here because it simplifies the query on the app side and allows us to handle mappings and transformations in our search provider, making future changes easier to manage without deploying new code.
As the previous post stated, CREATE and DELETE are separate operations that will need to be handled with separate webhooks. There may still be other considerations you’ll need to handle as well, such as a very large publish and the need to batch the querying of item data and the pushes to the search provider. Still, this example is a useful POC that you can adapt to your project’s search provider and specific requirements.