
This post is part of a series of posts on setting up your Sitecore application to run with Solr Cloud. We’ll be covering the procedure for setting up a Sitecore environment using the Solr search provider, and the creation of a 3-node Solr cloud cluster. This series is broken into four parts.
- Part 1 – Architecture
- Part 2 – Setting Up Zookeeper and Solr
- Part 3 – Creating Your Sitecore Collection
- Part 4 – Tuning Solr for Production
For the second part of this series, we will go through the steps to set up a Zookeeper Ensemble, individual Solr nodes, and linking them together in a Solr Cloud configuration. We’ll then create Windows services to start Zookeeper and Solr automatically on each server.
Part 1 of this series went over the prerequisites for this setup and discussed the architecture. We’ll be creating a Solr Cloud cluster using the 3 server configuration described in that post, with Zookeeper and Solr co-existing on the same machine. The steps below should be executed on each of the 3 servers we’re setting up. The steps are identical unless otherwise stated.
Java
The first step is simple. If you haven’t already installed the Java Runtime Environment on your server, you’ll need to do that. Download Java 8 here.
Zookeeper
Next we’ll setup our Zookeeper Ensemble. Zookeeper needs to be running before starting Solr, as you register the Zookeepers with the Solr node upon starting Solr up. For this walkthrough we used Zookeeper 3.4.6. Download and extract Zookeeper to a folder, for example C:\Zookeeper (you’ll need 7-zip for this).
In the /conf folder, copy the zoo_sample.cfg file to zoo.cfg. Edit the zoo.cfg file as follows,
# The number of milliseconds of each tick
tickTime=2000
# The number of ticks that the initial
# synchronization phase can take
initLimit=5
# The number of ticks that can pass between
# sending a request and getting an acknowledgement
syncLimit=2
# the directory where the snapshot is stored.
# do not use /tmp for storage, /tmp here is just
# example sakes.
dataDir=C:/zookeeper/data
# the port at which the clients will connect
clientPort=2181
# the maximum number of client connections.
# increase this if you need to handle more clients
#maxClientCnxns=60
#
# Be sure to read the maintenance section of the
# administrator guide before turning on autopurge.
#
# http://zookeeper.apache.org/doc/current/zookeeperAdmin.html#sc_maintenance
#
# The number of snapshots to retain in dataDir
#autopurge.snapRetainCount=3
# Purge task interval in hours
# Set to "0" to disable auto purge feature
#autopurge.purgeInterval=1
server.1=<node1.host>:2888:3888
server.2=<node2.host>:2888:3888
server.3=<node3.host>:2888:3888
The last 3 lines must be added, and represent the individual Zookeepers in the ensemble which Zookeeper will look for upon starting up. Replace <noden.host> with the hostname or IP address of that server node. An explanation of the remaning parameters can be found here.
Next you’ll have to create a file called myid (no extension) in the /data folder. Edit this file to contain the number of the server node, as specified in the config above. For example, C:\Zookeeper\data\myid on node 2 will contain “2”.
Startup Zookeeper on each of your nodes. In the /bin folder, run zkServer.cmd in a command prompt. You’ll notice some errors when starting the first node, this is because it cannot find the other nodes and reach a quorum. Once the other nodes are started, you should see log messages about leader election.
Now that Zookeeper is running, we can get started on Solr.
Solr
We’ll be using Solr 4.9.1 for this setup. First we’ll start up a single Solr node using some parameters to push configuration into Zookeeper. We can then use a parameter when creating collections to pull this configuration from Zookeeper, keeping our collections in sync.
Extract the Solr archive to a temporary directory. Inside that directory, find the /example folder. Copy the contents of this folder to a directory where Solr will live, for example D:\Solr. It is recommended that Solr and Zookeeper run on separate disks if they co-exist on the same machine.
Next, copy the schema.xml in the Solr directory you just created (e.g., D:\Solr\solr\collection1\conf) to your Sitecore app server. You’ll need to make some changes to this file before generating the schema in Sitecore, follow the steps outlined here.
Log into Sitecore and generate the Solr schema.xml using that edited file. You need to edit this file again to re-enable (uncomment) some field types Sitecore uses.
<fieldType name="pint" class="solr.IntField"/>
 <fieldType name="plong" class="solr.LongField"/>
 <fieldType name="pfloat" class="solr.FloatField"/>
 <fieldType name="pdouble" class="solr.DoubleField"/>
 <fieldType name="pdate" class="solr.DateField" sortMissingLast="true"/>
Copy the modified schema.xml back up to that same directory on the Solr server. We’ll start up a single node of Solr with some extra commands to load the Sitecore-specific configuration into Zookeeper. Open a command prompt, change to the Solr directory and run this command, replacing noden.host with the hostnames of each node, as defined in your Zookeeper config. Leave the port as 2181.
java -DnumShards=1 -Dbootstrap_confdir=./solr/collection1/conf -Dcollection.configName=sitecoreconf -DzkHost=node1.host:2181,node2.host:2181,node3.host:2181 -jar start.jar
In a browser, connect to Solr on this server at http://localhost:8983/solr. If Solr is up and running, check the Cloud tab on the left. You should see collection1->shard1 with a single replica running on this server. If Solr does not come up, check the log files in D:\Solr\log for the error.
Once you’ve verified Solr is running, stop the Solr and Zookeeper apps in your command prompt windows.
Creating the Services
We’ll need to set up Zookeeper and Solr as services in Windows so they will start automatically. There are many ways to do this, but the simplest way is using NSSM to create the services.
Download and extract NSSM to a directory. From a command prompt, change to that directory and run “nssm install“. For Zookeeper, on each set up a service in NSSM with the following configuration,
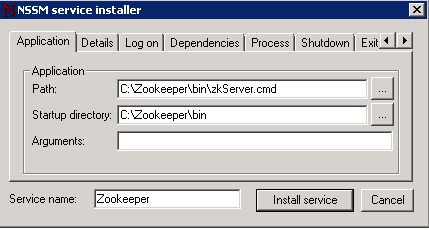
Click install service. Start the service on each node, and check the Zookeeper logs to make sure everything is working.
For Solr, we’ll create a .bat file to start the Solr app. In D:\Solr, create a file startsolr.bat. Edit the file to contain the following command,
java -DzkHost=node1.host:2181,node2.host:2181,node3.host:2181 -jar start.jar
Note that we’ve excluded some of the parameters we used the first time starting Solr. These are needed to push the configurations into Zookeeeper. Starting Solr with those commands again will push new configurations into Zookeeper, overwriting what is already there.
Run NSSM, and create a service for Solr on each server,
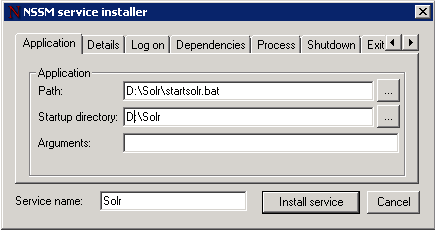
Start the Solr services on each server, and connect to http://localhost:8983/solr to verify it is running.
You now have a functioning Solr Cloud, the next step is to create our Sitecore collection and connect our Sitecore application to it.