TLDR: Don’t put spaces in your field names for Sitecore headless builds.
Quick post about a bug I uncovered today working on an XM Cloud project with a .NET rendering host.
We’re seeing inconsistent behavior when mapping layout service field data to types in .NET. In short, fields with spaces in the name sometimes do not deserialize into .NET types when you attempt to do so with the SDK.
Consider a page with 2 fields: Topic and Content Type. In our code, we have a class that looks like this:
namespace MySite.Models.Foundation.Base
{
  public class PageBase
  {
    [SitecoreComponentField(Name = "Content Type")]
    public ItemLinkField<Enumeration>? ContentType { get; set; }

    [SitecoreComponentField(Name = "Topic")]
    public ContentListField<Enumeration>? Topic { get; set; }
  }
}
When I create a component as a ModelBoundView, .AddModelBoundView<PageBase>("PageHeader") the fields map properly, and I get data in ContentType and Topic properties of my model.
When I try to map it from a service, like so:
namespace MySite.Services.SEO
{
  public class MetadataService
  {
    private SitecoreLayoutResponse? _response;

    public PageMetadata GetPageMetadata(SitecoreLayoutResponse? response)
    {
      _response = response;
      PageBase pageBase= new PageBase ();
      var sitecoreData = _response.Content.Sitecore;

      sitecoreData.Route?.TryReadFields<PageBase>(out pageBase);
      return pageMetadata;
    }
  }
}
I get no data in the Content Type field but I do in the Topic field. If I rename Content Type to ContentType, the field data is bound to the ContentType property as expected.
I dug into the code a little bit and it seems that the HandleReadFields method on the Sitecore.LayoutService.Client.Response.Model.FieldsReader is ignoring the property attributes: [SitecoreComponentField(Name = "Content Type")] Instead it is just using the property name, which of course has no spaces in it because it’s a C# identifier.
Until this bug is corrected, the workaround is to rename your fields to not have spaces in them.
Search is one of the biggest pieces of the puzzle when building a composable solution with Sitecore’s XM Cloud. Sitecore offers their own product, Sitecore Search, and there are a couple other search vendors that have native connectors. But what if you need to set up a search product that does not have a native connector to Sitecore, such as Yext? In this post, we’ll discuss how to use GraphQL + Experience Edge to crawl Sitecore via Yext’s API connector.
The first thing we want to do is figure out how we’ll get out content out of Sitecore. Ideally we want to be able to do this with a single query, rather than chaining queries together, in order to simplify the process of setting up the API crawler in Yext. For this, we’ll use a GraphQL search query. Let’s take a look at an example query:
Let’s take a look at this query, starting with the search filters.
_path allows us to query for every item that contains the rootPath in its path. For our site crawler, we’ll want to pass in the GUID of the site’s home page here.
_hasLayoutis a system field. This filter will exclude items that do not have a presenation assigned to them, such as folders and component datasources. We’ll want to pass in “true” here.
noIndex is a custom field we have defined on our page templates. If this box is checked, we want to exclude it from the crawl. We’ll pass in “1” here.
numResults controls how many results we’ll get back from the query. We’ll use 10 to start, but you can increase this if you want your crawl to go faster. (Be wary of the query response size limits!)
after is our page cursor. In our response, we’ll get back a string that points to the next page of results.
In the results area, we’re asking for some system fields like ID, name, path, and url. These are essential for identifying the content in Yext. After that, we’re asking for every field on the item. You may want to tune this to query just the fields you need to index, but for now we’ll grab everything for simplicity’s sake.
A question you may be asking is, “Why so many parameters?” The answer is to work around a limitation with GraphQL for Experience Edge:
Due to a known issue in the Experience Edge GraphQL schema, you must not mix literal and variable notation in your query input. If you use any variables in your GraphQL query, you must replace all literals with variables.
The only parameter we want to pass here is “after”, which is the page cursor. We’ll need our crawler to be able to page through the results. Unfortunately, that means we have to pass every literal value we need as a parameter.
In the results block we have our pages, along with all the fields we defined on the page template in the fields block. In the pageInfo block, we have endCursor, which is the string we’ll use to page the results in our crawler.
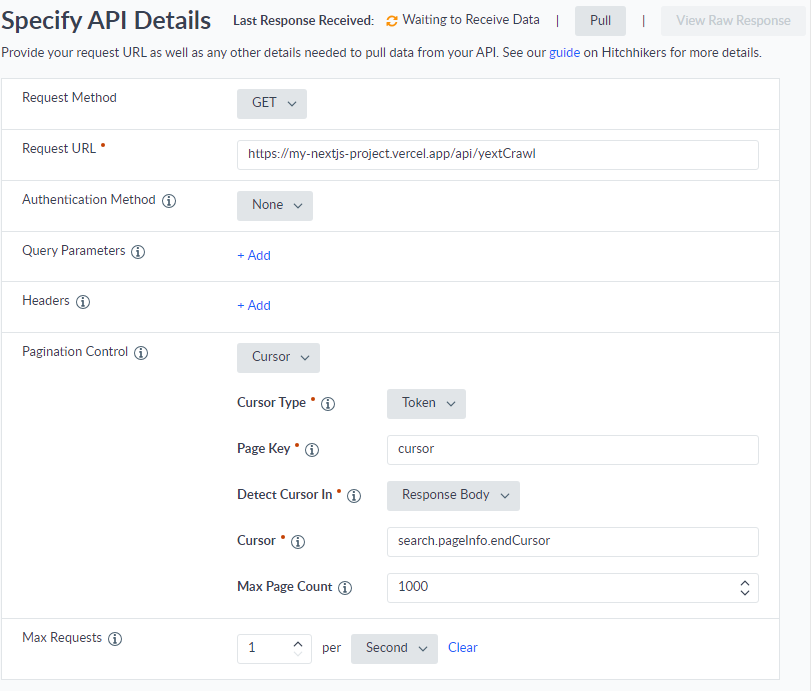
The next step is to set up the crawler in Yext. From Yext, you’ll want to add a “Pull from API” connector. On API Settings page, we can configure the crawler to hit Experience Edge in the Request URL field, pass our API key in the Authentication section, then put our GraphQL request in the Request Body section. Finally, we can set up the Pagination Control with our cursor. Easy, right?
Unfortunately, we’ll hit a problem here. Yext (as of this writing) only supports passing pagination parameters as query parameters. When we’re using GraphQL, we need to pass variables as part of the request body in the variables block. To work around this limitation, we’ll need to wrap our query in a simple API.
Next.js makes creating an API easy. You drop your api into the /pages/api folder and that’s it! Let’s make a simple API wrapper to take our page cursor as a query parameter and then invoke this query on Experience Edge. We’ll call our api file yextCrawl.ts.
We’re making a simple handler taking in a NextRequest and a NextResponse. We’ll check the request for our cursor parameter, if it exists. The GraphQL query we have as a literal string, cut and pasted from the XM Cloud playground where we tested it. The API key gets passed in the header, and we’ve configured this in our env.local and as an environment variable in Vercel.
Our request body will contain the query and the variables. This is where we’ll get around the limitation in the Yext Pull from API crawler. We’ll set up the cursor we pulled from the query parameters here. Our other variables we pass to the query are hard coded for the sake of this example.
Finally we use fetch to query Experience Edge and return the response. The result should be the same JSON we got from testing our query in the playground earlier. Once we deploy this api to Vercel, we can see it working at: https://my-nextjs-project.vercel.app/api/yextCrawl
Try hitting that url and see if you get back your Sitecore content. Then grab the endCursor value and hit it again, passing that value as the cursor parameter in the query string. You should see the next page of results.
Back in Yext, we’ll set up our Pull from API connector again, this time hitting our Vercel hosted API wrapper.
As you can see this is a lot easier to configure! Note the values of our cursor parameter under Pagination Control. These correspond to the cursor query parameter we defined in our wrapper API, and the endCursor data in the json response from our GraphQL query. It’s also important to configure the Max Requests setting. We’re limiting this crawler to 1 request per second so we don’t hit the request limit in Experience Edge.
You can test the connector with the Pull button on the top right. If you’ve set up everything correctly, you should see the View Raw Results button light up and be able to see your results in a modal window.
From here, you can configure the mappings of your Sitecore fields to your Yext entities. That is out of the scope of this post, but Yext’s documentation will help you there. One suggestion I will make is to map the Yext entity’s ID to the page’s Sitecore GUID, defined as id in our crawler query response.
Once it’s all set, save your connector, then you can run your crawler from the connector’s page by clicking “Run Connector”. If you’ve set everything up correctly, you should see your Sitecore content flowing into your Yext tenant.
Every once in a while, there comes a time when your automation fails, or it doesn’t do exactly what you need it to do, and you’re faced with a choice. Do you alter the automation scripts or do you just do it by hand? Recently I faced a situation when installing Sitecore 9.1 where SIF just didn’t create the collection databases. Rather than spend time debugging SIF, I decided to just create the collection databases by hand. Turns out, it wasn’t that hard.
My first instinct was to pull the .dacpac files from the Sitecore provided WDPs (web deploy packages) and deploy them to SQL myself. Job’s done right? But how do we create that ShardMapManagerDb database? There’s no package for that.
If you watch what SIF does during an installation, you may have noticed it runs something called the SqlShardingDeploymentTool.exe. Turns out, that tool does most of the work for us, and we just have to invoke it with the right parameters. Credit to this excellent post from Kelly Rusk that explains what these parameters do. Here are the steps to do it yourself.
Find the \App_Data\collectiondeployment folder in your XConnect instance. You can also extract this from the XConnect WDP package.
Create a collection_user in SQL. In my case SIF did this for me (despite not creating the collection DBs), but you will need to make one if doing this completely from scratch.
Prepare your command in notepad. You’ll need to pass the tool a lot of parameters, and feel free to reference the post linked earlier to understand them. Here’s one I used for reference:
Run a command prompt as administrator and navigate to the directory with the tool. Execute your prepared command. If all goes well you’ll see a tool.log in that folder that ends with *** Everything is done. Sitecore xDB Collection SQL Sharding Deployment Tool is about to end its work. *** Make sure you see your databases in SQL.
In the tool directory, you’ll see a few .sql scripts. We need to execute 2 of them to grant the proper permissions to the collection_user we created. In all cases, substitue the $(Username) variables with the name of your collection user.
CreateShardApplicationDatabaseUser.sql should be run against each of the shard databases. CreateShardManagerApplicationDatabaseUser.sql should be run against the shard map manager database. The other SQL scripts in this directory are unnecessary, they execute a subset of the commands in these two scripts.
If all went well you should be able to see XConnect connecting to and logging data to the newly created collection DBs. Happy Sitecoreing!
If you’ve been using Sitecore 9 or 9.1, you know that all the services the platform depends upon must communicate using trusted, secure connections. This includes Solr. Sitecore’s instructions and the scripts provided by SIF helpfully walk you through setting up a secure Solr installation as part of standing up your 9.1 environment. Jeremy Davis has also created a wonderful powershell script to install Solr with a self signed certificate that I’ve used quite a bit.
If you follow the steps outlined in these posts, you’ll have Solr Cloud up and running on separate machines. But, when it comes time to create a collection you’re going to run into a problem. You may see something like this in the response:
{"responseHeader":
{"status":0,"QTime":33294},
"failure":{"solr3:8983_solr":"org.apache.solr.client.solrj.SolrServerException:IOException occured when talking to server at: https://solr3:8983/solr","solr2:8983_solr":"org.apache.solr.client.solrj.SolrServerException:IOException occured when talking to server at: https://solr2:8983/solr"},
"success":
{"solr:8983_solr":
{"responseHeader":{"status":0,"QTime":2323},"core":"sample_collection_shard1_replica2"}}}
We created our certificates, the nodes are up and running, Zookeeper is aware of them all, but the Solr nodes can’t seem to communicate with each other. So what gives? If we dig into the logs on any of the Solr servers, we get a little more insight into the problem.
2019-03-05 19:04:49.869 ERROR (OverseerThreadFactory-8-thread-1-processing-n:solr2:8983_solr) [   ] o.a.s.c.OverseerCollectionMessageHandler Error from shard: https://solr3:8983/solr
 org.apache.solr.client.solrj.SolrServerException: IOException occured when talking to server at: https://solr3:8983/solr
     at org.apache.solr.client.solrj.impl.HttpSolrClient.executeMethod(HttpSolrClient.java:626)
     at
...
Caused by: javax.net.ssl.SSLHandshakeException: sun.security.validator.ValidatorException: PKIX path building failed: sun.security.provider.certpath.SunCertPathBuilderException: unable to find valid certification path to requested target
     at sun.security.ssl.Alerts.getSSLException(Alerts.java:192)
...
What we’re seeing here is the Solr servers don’t trust each other. We need to fix that.
There’s a couple of things we need to do here. First, we have to get the self-signed certificates we created for each Solr node and install them on the other servers. On each Solr server, do the following,
Open certlm.msc
Expand Trusted Root Certification Authority -> Certificates and find your Solr certificate you created.
Open the certificate and make a note of the thumbprint. We’ll need this later.
Export the certificate. Make sure you check Include Extended Properties and Mark this Certificate as Exportable in the dialogue.
When prompted for a password, use the same one you configured when installing Solr (the default is “secret”)
Once you have the certificates, you’ll need to install them on the other nodes. On each Solr server,
Import the certificates from the other 2 Solr nodes.
Try to hit the other Solr nodes from the browser on each server. For example, try accessing https://solr2:8983/solr/ from the Solr1 server. (You may need host file entries). If your certificates are installed properly, the browser will not warn you about an untrusted site.
There is one more thing we need to do. The Windows servers might trust our Solr nodes now, but the Solr applications themselves do not. If you take a look at the Solr installation steps, you’ll notice we’re creating a keystore file that holds the certificate for that Solr node (typically named . These keystore files needs to be updated to include the certificates from ALL of the Solr nodes, not just the one for the instance on that server.
We can easily do this with Powershell. We can do it with Java’s keytool.exe too, but we’re Sitecore people and probably more comfortable in Powershell! Remember those thumbprints we noted earlier? We’ll need them now.
Here’s the script, assuming your password is “secret”. Run this on any of the Solr nodes.
Take this generated solr-ssl.keystore.pfx file and copy it over the keystore file in each of the Solr nodes, then stop each node and restart them.
If we did everything correctly, when we try to create our collections again, it should go smoothly and you’ll be up and running with Solr Cloud and Sitecore 9.1.
For more information on the architecture of a Solr Cloud cluster and how to set one up for Sitecore, you can refer to my old blog series on the topic. It was written for 7.2, but the architecture principles haven’t changed. (including the need for a load balancer!)
Sitecore 9.1 comes bundled with a lot of new stuff, including a much improved Sitecore Install Framework. The process of setting up a local environment has been greatly streamlined, now you only need to run a script for installing prerequisites and then the XP0 installer itself. This gives you an instance of XConnect, Sitecore Identity server, both setup on HTTPS with trusted certificates. It will also install the Sitecore XP application for you and set it up on HTTP.
If you need to secure the Sitecore XP application as well, you could create a certificate in IIS and assign it to the HTTPS binding. However, this certificate won’t be trusted, and you’ll have the additional problem that Sitecore Identity Server won’t trust the site either, meaning you can’t log in over HTTPS. We’ll have to do a couple things to get past this.
You may see this error when trying to log into Sitecore 9.1 over HTTPS.
Create a new Trusted Certificate for IIS
First, we have to make a trusted certificate and assign it to our CM site. The certificate generated by IIS won’t cut it, because it uses the SHA1 encryption algorithm which is not accepted by modern browsers. Instead, let’s do what SIF does and make a certificate using Powershell. Alter the DnsName parameter to match the hostname of the Sitecore XP instance you’re working on.
Next we’ll need to export that certificate out of the Personal store and into the Trusted Root Certification Authority. Again, this is exactly what SIF does for XConnect and Identity Server. We can script this too, but it’s easy to do using the UI.
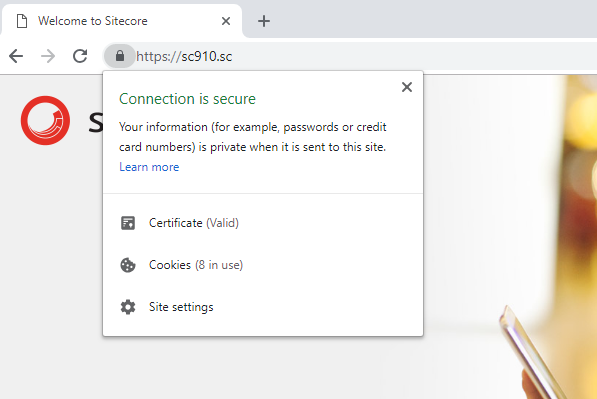
In Windows, run certlm.msc. This is the Local Computer Certificate manager.
Expand Personal -> Certificates and find the sc910.sc certificate.
Right click, and chose Tasks -> Export. Accept the defaults and save the certificate somewhere.
Expand Trusted Root Certification Authority, right click Certificates and choose All Tasks -> Import
Choose your certificate file you just created, and again accept the defaults.
If you did everything correctly, you should see this certificate available in IIS when you try to set up the HTTPS binding.
Setting up the HTTPS binding in IIS with our new certificate.
Try hitting your site in your browser, and you should not be prompted that the certificate is not trusted.
Chrome trusts our local Sitecore XP instance now.
However, we still can’t log into Sitecore. The login page says our client is unauthorized. What gives?
Configure Identity Server to Allow a New Client
We have to do one more thing, and that’s tell the Sitecore Identity Server about this new binding. To do this we need to edit a config in the identity server application. Open up \Config\production\Sitecore.IdentityServer.Host.xml in your identity server application folder. Look for the <Clients> block and add a line for our new secure XP binding.
Sitecore 9.1 has just hit, and with it comes a lot of exciting new features. You’ll probably be hearing and reading a lot about the Big Things they’re announcing with this release, such as the general availability of Sitecore Javascript Services (JSS), automated personalization with Cortex, Sitecore’s acquisition of digital asset manager StyleLabs, and their partnership with Salesforce.
However, there are some great quality of life enhancements coming with this release as well, which may be of particular interest to developers. Here’s a few that were highlighted.
Performance
Anyone who’s worked with Sitecore for a while, especially as a developer, has noticed how long it takes to start up the application. This can be a huge drag on productivity when you have to wait and wait for application pool recycles, especially if you’re in a rapid development cycle. You lose momentum, you lose focus, and it’s just annoying. The team at Sitecore has heard these complaints and made some serious strides on this in 9.1.
Sitecore showed some benchmarks and 9.1 is boasting a startup-time that’s cut in half. That’s time from a cold start of a CM instance to loading the Launchpad. Not bad! They’ve also cut the number of .dlls the /bin folder in half, increased the load time of the Content Editor by a factor of 6, and shaved some load time of the Experience Editor as well.
3rd Party Integrations
Sitecore has historically lagged behind in updating their integrations with supporting software. This was highlighted last year with the exposure of a security flaw in their Telerik version. In 9.1, we’ll see support for the latest versions of Sitecore’ supporting software, including Telerik, Newtonsoft Json.net, Solr, and of course .NET Core.
Horizon
The current Sitecore back-end has been essentially the same for many years, some CSS updates notwithstanding, and it’s lagging behind the competition. If you were at Symposium last year, it was mentioned during the closing keynote that Sitecore is working on an overhaul of their UI and authoring experience. This year they’ve announced the early-access availability of Horizon.
So, what is Horizon? Right now we’re not entirely sure. It’s meant to address the concerns of customers with the current Experience Editor. We know it’s an overhaul of the Experience Editor at least, but will it exist next to it, replace it outright, or complement it?
Sitecore is releasing an early access version of Horizon later this month and we’ll know a lot more. They want feedback, so as a developer you should download Horizon when it’s available, beat on it, and let them know what you think!
Native Indexing of Binary Content
Another small but welcome enhancement is the ability for the Content Search crawler to index PDF and MS Word files, out of the box. This was possible before with the installation of 3rd party tools, but Sitecore has heard their users and is wisely including this as a core feature.
That’s all for now. When Sitecore 9.1 hits, make sure to crack it open and put some of these changes through their paces. I certainly will be!
Sitecore 9 is here, it’s in our lives, and we’re at the point where the projects we started at the beginning of the year are getting ready to roll out. That means we need to get our production environments ready. If you’re coming from the Sitecore 8.x and earlier world, this can be a challenge. There’s new databases, the xConnect service, security and certificate requirements, and of course our friend Solr is mandatory now. We have a new tool to help us get through all this, the Sitecore Install Framework (or SIF). It’s supposed to help us by automating our install steps, if you know how to use it.
Fortunately, Sitecore has really stepped up their documentation, especially with version 9. There’s a detailed guide on installing Sitecore 9, which covers a single instance (probably a local developer environment) and a scaled out production instance. However, when they say scaled out , they mean scaled out. There’s a script for every possible server role. In the real world, our environments don’t match what’s exactly in the documentation. For example, we often combine roles, or share hardware. We need to make some adjustments, and that’s when we start to go off the map.
Check out Velir’s new video where we recap the 2017 Sitecore Symposium! I talk to our CTO Corey Caplette, Senior U/X Strategist Dan Murphy, and Development Manager Ed Schwehm and get their thoughts about the new features in Sitecore 9.
Velir’s Jabberwocky framework has been updated for Sitecore 9.0, initial release. This update doesn’t add any new features beyond support for Sitecore 9.
For now, the package is marked prerelease, due in-part to the dependency on Glass.Mapper, which is still in prerelease for Sitecore 9 support. We’ll be assessing the framework during our upcoming Sitecore 9 upgrades and projects, and we will correct any uncaught issues with the framework. A final release will be available in the coming months.
Sitecore’s new PaaS offering in Azure is now available. When you’re creating an instance of Sitecore Experience Platform, you’re required to provide a MongoDB connection string for XDB. There are a few options in Azure for a Mongo service, but I decided to try to set it up with Microsoft’s Cosmos DB (formerly DocumentDB). Unfortunately, it didn’t work immediately, so I had to dig in a little bit to get my new PAAS Sitecore instance up and running. This post will walk through setting up Cosmos DB in Azure, attaching it to a new Sitecore PAAS instance, and deploying some custom code to our Sitecore instance to resolve the error connecting to Cosmos DB.
Setup Azure Cosmos DB
The first thing you want to do is set up Cosmos DB in Azure. Log into your portal, and select New Resource on the left. Select Database, then “Database as a Service for MongoDB”. You’ll need to provide a resource ID, as well as a Resource Group and select a Location. Fill out the fields and click create. After a few moments your new Cosmos DB instance will be available.
If you didn’t click Pin to Dashboard before creating, you can find it in the Resouces list. Click on the new database and open up the resouce viewer. You’ll see some general information in the Overview tab. On the left, find and click Connection String under Settings. Here you’ll see the connection strings, port number, username and password you’ll need to connect Sitecore to CosmosDB.
Notice at the bottom of this page the disclaimer, “Azure Cosmos DB has strict security requirements and standards. Azure Cosmos DB accounts require authentication and secure communication via SSL.” This is a problem for Sitecore out of the box, and where we’ll need to do some customization to support secure connections to Mongo.
Setup Sitecore PaaS
Next we’ll set up Sitecore PAAS. This is quite easy with the latest release of Sitecore 8.2, update 3. If you click the New Resource button and search for Sitecore, you’ll see two offerings. Sitecore Experience Platform 8.2, and Sitecore Web Experience Manager 8.2. Since we’re setting up Mongo, that means we need Sitecore XP, so choose that. You’ll need to configure a few things. For the SQL, a username and password. For Sitecore, you’ll need to provide the admin password and your license file. Make a note of these.
Under Sitecore XP Settings, you’ll need to provide connection strings to MongoDb. These will be available in the resource view for the CosmosDB instance we set up, if you didn’t make a note of them previously. You’ll need to edit that connection string to add the XDB table name that Sitecore expects. For example, for the analytics connection string,
It will take some time for your new Sitecore environment to be provisioned. Once it’s ready, open up the resource viewer. In the Essentials view, you’ll see the url of your new instance. Go ahead and open that up, and you’ll see the familiar Sitecore welcome page. You can even log into Sitecore. In Azure, open up Application Insights and view the Log Stream (you may need to turn on Application Logs in the Diagnostic Logging tab first). You’re probably seeing errors related to MongoDb, in particular an error about the transport stream.
“Unable to connect to a member of the replica set matching the read preference Primary: Authentication failed because the remote party has closed the transport stream.”
This is because Cosmos DB requires an SSL connection, and out of the box, Sitecore does not support that. So, we’ll need to deploy a fix for this. Fortunately, Sitecore provides us a pipeline to hook into to override the MongoDB Connection behavior. To correct this issue, we’ll need to enable secure connections to MongoDB.
Deploying a change to Sitecore PaaS
We’ll need to create a class to insert into the updateMongoDriverSettings pipeline. Our processor is going to explicitly set the connection mode to be secure and tell it to use TLS 1.2 in order to connect to Cosmos DB. Here’s the code:
using System.Security.Authentication;
using MongoDB.Driver;
using Sitecore.Analytics.Pipelines.UpdateMongoDriverSettings;

namespace Sitecore.SharedSource.CustomMongo
{
  public class CustomMongoDbClientProcessor : UpdateMongoDriverSettingsProcessor
  {
    public override void UpdateSettings(UpdateMongoDriverSettingsArgs args)
    {
    args.MongoSettings.SslSettings = new SslSettings();
    args.MongoSettings.SslSettings.EnabledSslProtocols = SslProtocols.Tls12;
    }
  }
}
And here’s the config file we need to insert the processor:
Finally we need to deploy this to our Azure app. Azure offers a lot of options for deployment, but for this example we’ll settle for FTP. You’ll need to set up credentials for the FTP connection, you can do that under Deployment credentials.
Once you’ve done that, take a look at the overview page, and you’ll see your FTP information.
Connect with your FTP client of choice, and upload our new DLL with our processor to the /bin folder and our new config to App_Config/Include/zzz.
With this processor in place, Sitecore should now be connected to Cosmos DB.


 Sitecore 9.1 has just hit, and with it comes a lot of exciting new features. You’ll probably be hearing and reading a lot about the Big Things they’re announcing with this release, such as the general availability of Sitecore Javascript Services (JSS), automated personalization with Cortex, Sitecore’s acquisition of digital asset manager StyleLabs, and their partnership with Salesforce.
 Sitecore 9 is here, it’s in our lives, and we’re at the point where the projects we started at the beginning of the year are getting ready to roll out. That means we need to get our production environments ready. If you’re coming from the Sitecore 8.x and earlier world, this can be a challenge. There’s new databases, the xConnect service, security and certificate requirements, and of course our friend Solr is mandatory now. We have a new tool to help us get through all this, the Sitecore Install Framework (or SIF). It’s supposed to help us by automating our install steps, if you know how to use it.
 Velir’s Jabberwocky framework has been updated for Sitecore 9.0, initial release. This update doesn’t add any new features beyond support for Sitecore 9.