There are several posts out there about how to set up a Sitecore login process with Identity Server and Azure Entra ID (or, Azure AD). Recently I had to implement this for a customer and discovered that there was no one post that covered everything from end-to-end. So, we’ll do that here.
Here’s a quick diagram to demonstrate the login flow with Azure Entra ID and Sitecore:
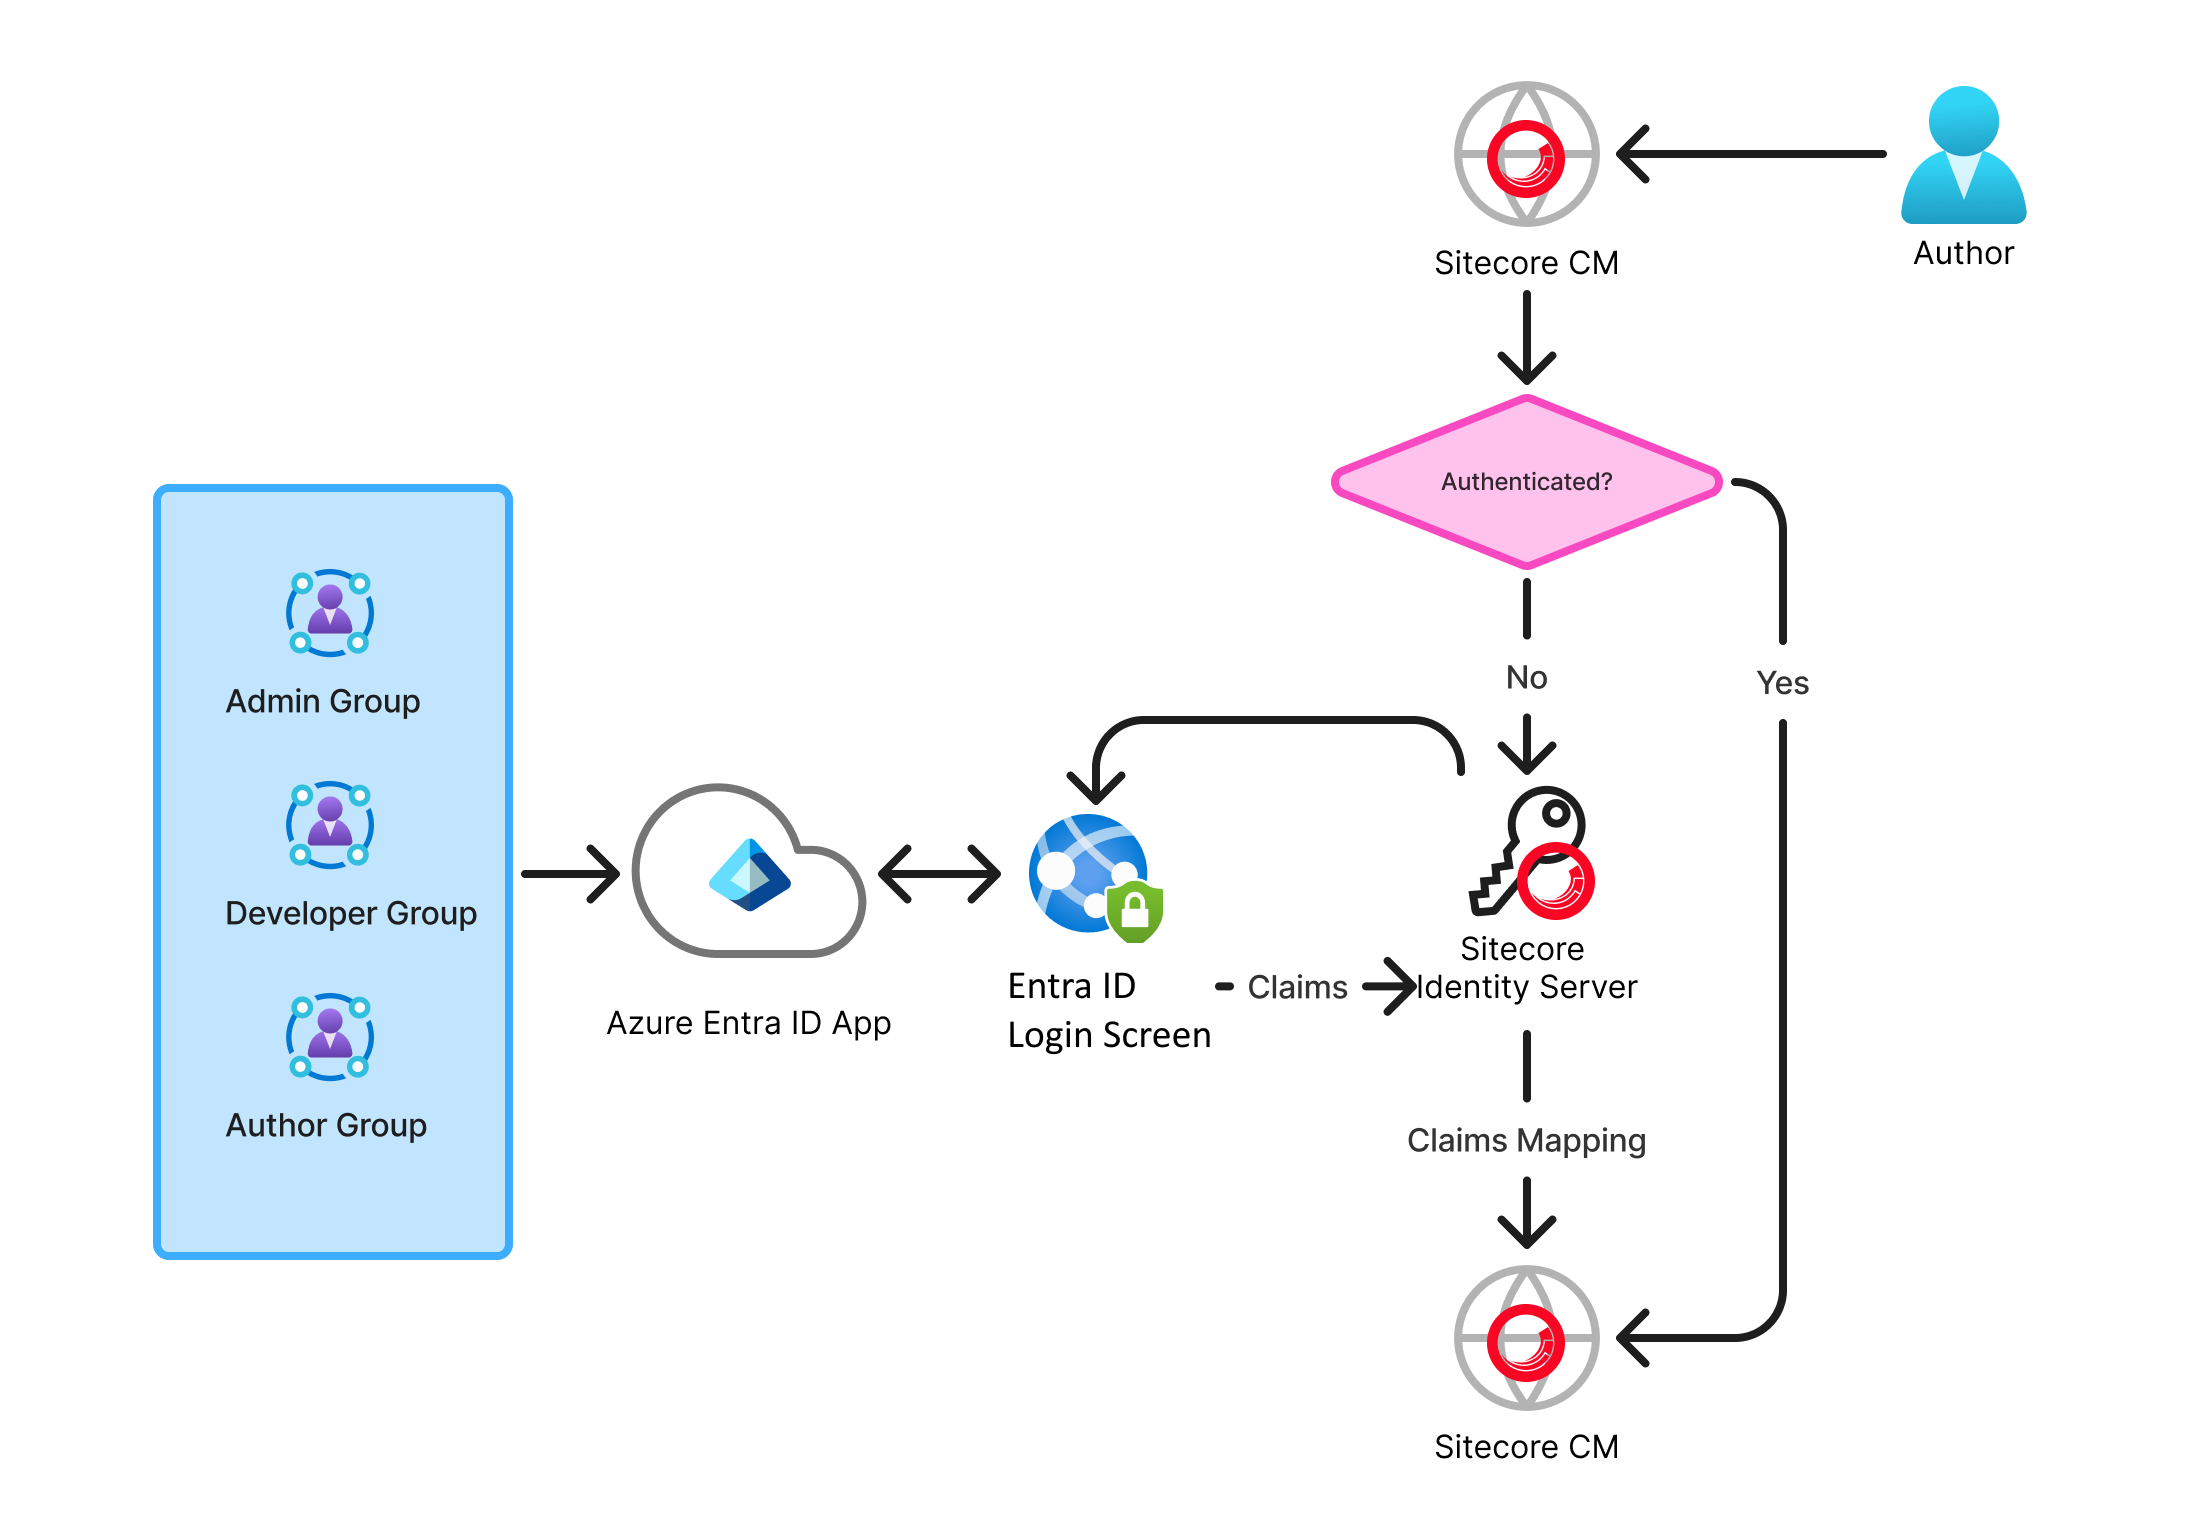
There are a few pieces of this:
Azure Entra ID Application setup:
Group definitions
User group assignment
Redirect URI
Sitecore Identity Server configuration:
Entra ID app configuration
Group claim to Sitecore Role mapping
Sitecore CM Configuration:
Virtual user configuration
Custom user builder
User Claim to User Profile mapping
Entra ID App Setup
First, you need an Azure Entra ID app set up that will allow logins. That is outside of the scope of this post, we’re going to assume that the IT department of your org is handling that.
Ideally, each Sitecore environment requires a corresponding Entra ID App in Azure. This is primarily because of the Redirect URI parameter, which issues a redirect to Sitecore’s Identity Server after authentication, along with the claims in a JWT (JSON Web Token).
You’ll need the following information:
Client ID and Tenant ID: These GUIDs map to the specific instance of Azure Entra ID your app will connect to.
Redirect URI: Provide this to the Azure Entra ID app. This should be the URL of Identity Server, plus the sign-in endpoint. For example: https://identityserver.dev.local/signin-oidc
You’ll need to determine what groups in Azure will map to what roles in Sitecore, and note the GUIDs of these groups, as they’ll be sent over as claims for the user that you’ll need to map.
Identity Server Configuration
Next we’ll configure Sitecore Identity Server. The good news is that Sitecore 10.2 and later ships with an example configuration you can reference. But we’ll need to make some changes.
First, it’s very common for User Preferred Name to be sent across as a claim from Azure, as upn. Sitecore, be default, doesn’t accept this claim, so we need to configure it. To configure this. update the identityServer.xml file to add the upn claim as follows:
<IdentityResources>
  <SitecoreIdentityResource>
    <Name>sitecore.profile</Name>
    <UserClaims>
      <UserClaim0>upn</UserClaim0>
      <UserClaim1>name</UserClaim1>
      <UserClaim2>email</UserClaim2>
      <UserClaim3>role</UserClaim3>
      <UserClaim4>
        <http://www.sitecore.net/identity/claims/isAdmin</UserClaim4>
      <UserClaim5>
        <http://www.sitecore.net/identity/claims/originalIssuer
      </UserClaim5>
    </UserClaims>
    <Required>true</Required>
  </SitecoreIdentityResource>
</IdentityResources>
Next, you must enable the Azure AD (Azure Entra ID is a rebranding of Azure AD) configuration in Identity Server and add the app keys and group claim IDs. In this example, I’m mapping 3 groups to 3 different roles in Sitecore, Admin, Developer, and Author:
<?xml version="1.0" encoding="utf-8"?>
<Settings>
  <Sitecore>
    <ExternalIdentityProviders>
      <IdentityProviders>
        <AzureAd type="Sitecore.Plugin.IdentityProviders.IdentityProvider, Sitecore.Plugin.IdentityProviders">
          <AuthenticationScheme>IdS4-AzureAd</AuthenticationScheme>
          <DisplayName>Stewart SSO</DisplayName>
          <Enabled>true</Enabled>
          <ClientId>[Azure Entra ID App ClientId]</ClientId>
          <TenantId>[Azure Entra ID App TenantId]</TenantId>
          <MetadataAddress></MetadataAddress>
          <ClaimsTransformations>
            <!--Place transformation rules here. -->
            <ClaimsTransformation1 type="Sitecore.Plugin.IdentityProviders.DefaultClaimsTransformation, Sitecore.Plugin.IdentityProviders">
              <SourceClaims>
                <Claim1 type="http://schemas.xmlsoap.org/ws/2005/05/identity/claims/upn" />
              </SourceClaims>
              <NewClaims>
                <Claim1 type="upn" />
              </NewClaims>
            </ClaimsTransformation1>
            <ClaimsTransformation2 type="Sitecore.Plugin.IdentityProviders.DefaultClaimsTransformation, Sitecore.Plugin.IdentityProviders">
              <SourceClaims>
                <Claim1 type="http://schemas.xmlsoap.org/ws/2005/05/identity/claims/emailaddress" />
              </SourceClaims>
              <NewClaims>
                <Claim1 type="email" />
              </NewClaims>
            </ClaimsTransformation2>
            <!--Transformation samples-->
            <!--AzureAD user group to Sitecore role transformation.-->
            <AzureGroupTransformation1 type="Sitecore.Plugin.IdentityProviders.DefaultClaimsTransformation, Sitecore.Plugin.IdentityProviders">
              <SourceClaims>
                <Claim1 type="groups" value="[Author Group Claim ID]" />
              </SourceClaims>
              <NewClaims>
                <Claim1 type="role" value="sitecore\Author" />
              </NewClaims>
            </AzureGroupTransformation1>
			<AzureGroupTransformation2 type="Sitecore.Plugin.IdentityProviders.DefaultClaimsTransformation, Sitecore.Plugin.IdentityProviders">
              <SourceClaims>
                <Claim1 type="groups" value="[Developer Group Claim ID]" />
              </SourceClaims>
              <NewClaims>
                <Claim1 type="role" value="sitecore\Developer" />
              </NewClaims>
            </AzureGroupTransformation2>
            <!--AzureAD user in specific group to Sitecore admin user transformation-->
            <AzureADUserToAdminUser type="Sitecore.Plugin.IdentityProviders.DefaultClaimsTransformation, Sitecore.Plugin.IdentityProviders">
              <SourceClaims>
                <Claim1 type="groups" value="[Admin Group Claim ID]" />
              </SourceClaims>
              <NewClaims>
                <Claim1 type="http://www.sitecore.net/identity/claims/isAdmin" value="true"/>
              </NewClaims>
            </AzureADUserToAdminUser>
          </ClaimsTransformations>
        </AzureAd>
      </IdentityProviders>
    </ExternalIdentityProviders>
  </Sitecore>
</Settings>
Example path on local env: C:\inetpub\wwwroot\identityserver.dev.local\sitecore\Sitecore.Plugin.IdentityProvider.AzureAd\Config\Sitecore.Plugin.IdentityProvider.AzureAd.xml
Once these edits are complete, you must stop and start Identity Server for the changes to take effect.
Sitecore CM Configuration
Role mappings are sent over as claims from Identity Server. Virtual user creation and user profile claims mappings are handled by the Sitecore CMS app’s federated authentication pipelines. To accomplish this, a custom user builder was needed.
The custom user builder is necessary to map the upn claim to the virtual user’s username. Without this, Sitecore generates a random string of characters for the username, which is not useful for seeing what authors are doing in the CMS. Here is an example class, AzureEntraIdExternalUserBuilder.cs
namespace Thread.Foundation.Account.Services
{
	public class AzureEntraIdExternalUserBuilder : DefaultExternalUserBuilder
	{
		private readonly IHashEncryption _hashEncryption;
		public AzureEntraIdExternalUserBuilder(ApplicationUserFactory applicationUserFactory, IHashEncryption hashEncryption)
			: base(applicationUserFactory, hashEncryption)
		{
			_hashEncryption = hashEncryption;
		}

		protected override string CreateUniqueUserName(UserManager<ApplicationUser> userManager, ExternalLoginInfo externalLoginInfo)
		{
			Assert.ArgumentNotNull(userManager, "userManager");
			Assert.ArgumentNotNull(externalLoginInfo, "externalLoginInfo");
			ClaimsIdentity externalIdentity = externalLoginInfo.ExternalIdentity;
			IdentityProvider identityProvider = base.FederatedAuthenticationConfiguration.GetIdentityProvider(externalIdentity);
			if (identityProvider == null)
			{
				throw new InvalidOperationException("Unable to retrieve an identity provider for the given identity");
			}

			string domain = identityProvider.Domain;
			string upn = externalIdentity.Claims.FirstOrDefault((Claim c) => c.Type == "upn")?.Value;

			if (string.IsNullOrWhiteSpace(upn))
			{
				// No UPN claim found, fallback to default behavior
				return base.CreateUniqueUserName(userManager, externalLoginInfo);
			}

			return $"{domain}\\{upn}";
		}
	}
}
To enable this custom user builder, you must update the federated user mapping configuration:
Foundation.Account.AzureEntraId.config
<configuration xmlns:patch="http://www.sitecore.net/xmlconfig/" xmlns:role="http://www.sitecore.net/xmlconfig/role/">
	<sitecore role:require="Standalone or ContentManagement">
		<federatedAuthentication>
			<identityProvidersPerSites>
				<mapEntry name="all sites" type="Sitecore.Owin.Authentication.Collections.IdentityProvidersPerSitesMapEntry, Sitecore.Owin.Authentication" resolve="true">
					<externalUserBuilder patch:instead="externalUserBuilder" type="MyProject.Foundation.Account.Services.AzureEntraIdExternalUserBuilder, MyProject.Foundation.Account" resolve="true">
						<IsPersistentUser>false</IsPersistentUser>
					</externalUserBuilder>
				</mapEntry>
			</identityProvidersPerSites>
			<propertyInitializer>
				<maps>
					<map name="set IsAdministrator" type="Sitecore.Owin.Authentication.Services.DefaultClaimToPropertyMapper, Sitecore.Owin.Authentication" resolve="true">
						<data hint="raw:AddData">
							<source name="http://www.sitecore.net/identity/claims/isAdmin" value="true" />
							<target name="IsAdministrator" value="true" />
						</data>
					</map>
					<map name="set Email" type="Sitecore.Owin.Authentication.Services.DefaultClaimToPropertyMapper, Sitecore.Owin.Authentication" resolve="true">
						<data hint="raw:AddData">
							<source name="email" />
							<target name="Email" />
						</data>
					</map>
					<map name="set Name" type="Sitecore.Owin.Authentication.Services.DefaultClaimToPropertyMapper, Sitecore.Owin.Authentication" resolve="true">
						<data hint="raw:AddData">
							<source name="name" />
							<target name="FullName" />
						</data>
					</map>
				</maps>
			</propertyInitializer>
		</federatedAuthentication>
	</sitecore>
</configuration>
Note we’re not mapping the upn claim to a profile property here. We’re only using that for the custom user builder to make the username in Sitecore match the username in Azure.
Also note the line IsPersistentUser. This setting determines if the user will be created as a virtual user or not. Toggling this to true will persist the user in the Core database, and is generally not considered best-practice.
Troubleshooting
When debugging this feature, you will likely need to inspect the claims sent to Sitecore. There are 2 steps here. The first set of claims is sent from Azure to Sitecore Identity Server. The second set of claims is sent from Sitecore Identity server to Sitecore CM.
Analyzing claims from Azure
To do this you need to capture the requests in your browser’s network tab. Look for a request to the Redirect URI defined in the Azure app. (E.g. On your local environment, this will be https://identityserver.dev.local/signin-oidc)
Look at the request’s Payload for the id_token. This is the JWT containing all the claims passed from Azure to Sitecore Identity Server. You can copy/paste this value into a tool that decodes JWT tokens, such as JWT.IO
Analyzing Claims from Sitecore Identity Server
Install and use my friend Robbert Hock’s “SI Snitch” module: GitHub – KayeeNL/SI-Snitch: A small utility for inspecting claims on a Sitecore instance that are coming from a Sitecore Identity Server.
This module will log all the claims sent to Sitecore in the log file, in the following format:
21060 10:33:33 INFO  oO SI Snitch Oo -- Claim: iss || Value: https://identityserver.dev.local
21060 10:33:33 INFO  oO SI Snitch Oo -- Claim: nbf || Value: ...
...
*claims data, omitted *
...
21060 10:33:33 INFO  oO SI Snitch Oo -- Claim: http://schemas.xmlsoap.org/ws/2005/05/identity/claims/name || Value: Chris Sulham
21060 10:33:33 INFO  oO SI Snitch Oo -- Claim: http://www.sitecore.net/identity/claims/cookieExp || Value: 1759503513
14916 10:33:35 INFO  AUDIT (sitecore\Anonymous): Login successful: sitecore\Chris.Sulham@velir.com.