In a previous post, we went over how to use GraphQL and a custom Next.js web service to crawl and index our Sitecore XM Cloud content into a search provider. That crawler runs on a schedule, so what happens when your authors update their content? They’ll need to wait for the next run of the crawler to see their content in the search index. This is a step back in capabilities from legacy Sitecore XP, which updated indexes at the end of every publish.
It’s possible to recreate this functionality using Experience Edge webhooks. Experience Edge offers quite a few webhook options (see the list here). To enable near real-time updates of our search index, we’ll use the ContentUpdated webhook, which fires after a publish to Edge from XM Cloud finishes. Let’s take a look at an example payload from that webhook:
{
  "invocation_id": "56a95d51-b2af-496d-9bf1-a4f7eea5a7cf",
  "updates": [
    {
      "identifier": "FA27B51EE4394CBB89F8F451B13FF9DC",
      "entity_definition": "Item",
      "operation": "Update",
      "entity_culture": "en"
    },
    {
      "identifier": "80471F77728345D4859E0FD004F42FEB",
      "entity_definition": "Item",
      "operation": "Update",
      "entity_culture": "en"
    },
    {
      "identifier": "80471F77728345D4859E0FD004F42FEB-layout",
      "entity_definition": "LayoutData",
      "operation": "Update",
      "entity_culture": "en"
    },
    {
      "identifier": "7C77981F5CE04246A98BF4A95279CBFB",
      "entity_definition": "Item",
      "operation": "Update",
      "entity_culture": "en"
    },
    {
      "identifier": "FFF8F4010B2646AF8804BA39EBEE8E83-layout",
      "entity_definition": "LayoutData",
      "operation": "Update",
      "entity_culture": "en"
    }
  ],
  "continues": false
}
As you can see, we have item data here and layout data. The layout data is what we’re interested in, as this represents our actual web pages, and that is what we want to index.
The general process is as follows:
- Set up a receiver for this webhook. We’ll do this with a Next.js function.
- Loop over the webhook payload and for each piece of
LayoutData, then make a GraphQL query to get the field data from Experience Edge. - Finally, roll up the field data into a JSON object and push it to our search index.
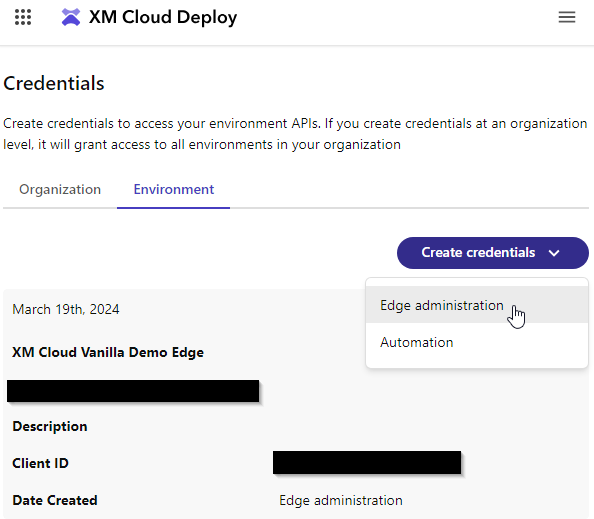
Let’s start by setting up our webhook. You’ll need to create an Edge administration credential in the XM Cloud Deploy app. Make note of the Client ID and Client Secret. The secret will only be displayed once, so if you lose it you will need to create new credentials.
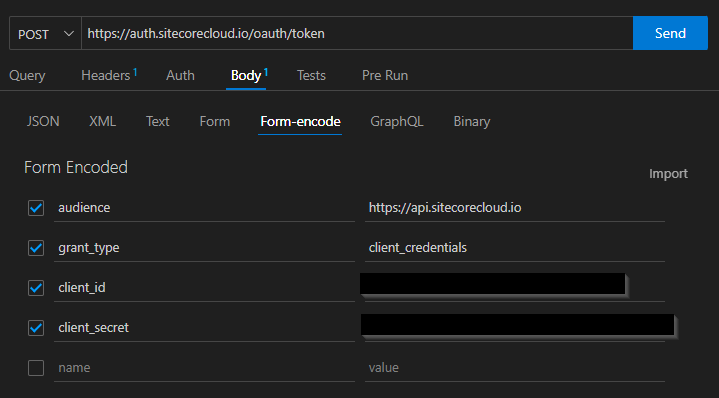
The next step is to create an auth token, you’ll need this to perform any Experience Edge administration actions. I used the ThunderClient plugin for Visual Studio Code to interact with the Sitecore APIs. To create an auth token, make a post request to https://auth.sitecorecloud.io/oauth/token with the following form data, using the client id and secret you just created in XM Cloud:
You’ll get back a json object containing an access token. This token is needed to be sent along with any API requests to Experience Edge. This token is passed as a Bearer Token in the Auth header. We can test it with a simple GET request that will list all the webhooks in this Edge tenant.
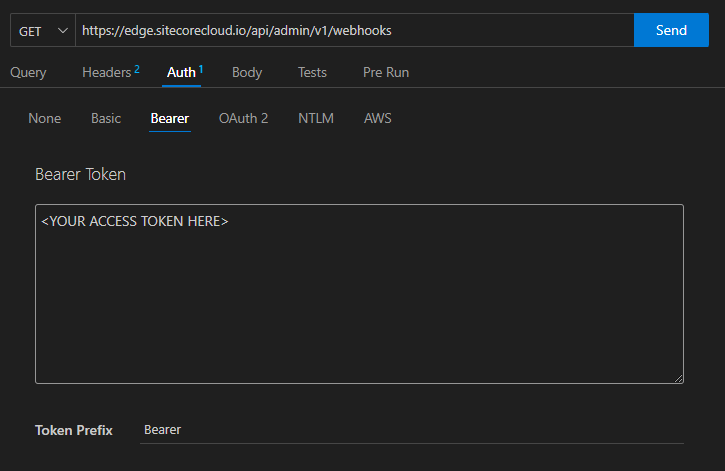
You should get back a json object containing a list of all the webhooks currently set up in your tenant (which is likely none to begin). The auth tokens expire after a day or so. If you get a message like edge.cdn.4:JWT Verification failed in your response, you have a problem with your token and should generate a new one.
Next let’s create our ContentUpdated webhook. You’ll need something to receive the webhook. Since we haven’t created our function in Next.js yet, we can use a testing service like Webhook.site. Create a POST request to https://edge.sitecorecloud.io/api/admin/v1/webhooks with the following body:
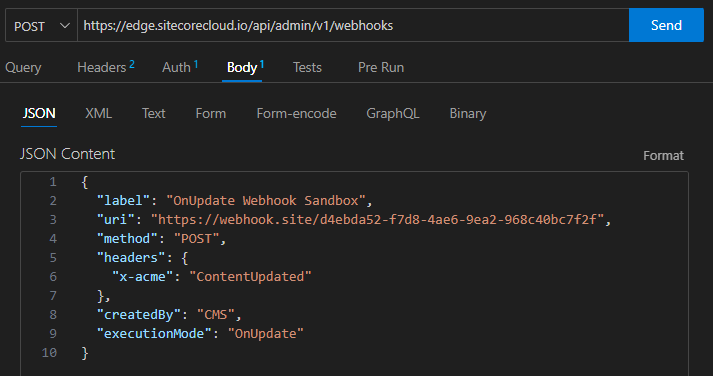
The important parameters here are uri and executionMode. The uri is where the webhook will be sent, in this case our testing endpoint at webhook.site. The execution mode OnUpdate indicates this will fire when content is Updated. (Note: There are separate webhooks for create and delete, which you will probably need to set up later following this same pattern.)
Send this request and you’ll get a response that looks like this:
{
  "id": "3cc79139-294a-449e-9366-46bc629ffddc",
  "tenantId": "myTenantName2157-xmcloudvani7a73-dev-2bda",
  "label": "OnUpdate Webhook Sandbox",
  "uri": "https://webhook.site/#!/view/d4ebda52-f7d8-4ae6-9ea2-968c40bc7f2f",
  "method": "POST",
  "headers": {
    "x-acme": "ContentUpdated"
  },
  "body": "",
  "createdBy": "CMS",
  "created": "2024-04-03T15:42:43.079003+00:00",
  "bodyInclude": null,
  "executionMode": "OnUpdate"
}
Try your GET request again on https://edge.sitecorecloud.io/api/admin/v1/webhooks, and you should see your webhook returned in the json response.
Try making some content updates and publishing from XM Cloud. Over at webhook.site, wait a few minutes and make sure you’re getting the json payload sent over. If so, you’ve set this up correctly.
To delete this webhook, you can send a DELETE request to https://edge.sitecorecloud.io/api/admin/v1/webhooks/<your-webhook-id>. Make sure you include your auth bearer token!
In the next post, we’ll go over handling this webhook to push content updates into our search index.